Kid-Approved Low Sugar Banana Pudding Ice Cream (Ninja Creami)
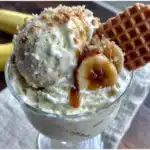
A creamy, low-sugar banana pudding ice cream made in the Ninja Creami that tastes indulgent without the sugar crash. Perfect for family movie nights and picky eaters.
- Prep Time: 10 minutes
- Cook Time: 0 minutes
- Total Time: 24 hours 10 minutes
- Yield: 4 servings 1x
- Category: Dessert
- Cuisine: American
Ingredients
Scale
- 2 large ripe bananas (the spottier, the better)
- 1 ½ cups whole milk
- ½ cup heavy cream
- 1 box (1 oz) sugar-free vanilla instant pudding mix
- 2 tablespoons honey or maple syrup (optional)
- ½ teaspoon vanilla extract
- Pinch of salt
- ¼ cup crushed sugar-free vanilla wafers (optional)
- ¼ cup chopped walnuts or pecans (optional)
- 2 tablespoons sugar-free chocolate chips (optional)
Instructions
- Prep your bananas. Peel those overripe bananas and break them into chunks. Place them in a blender or a deep bowl if you’re using an immersion blender.
- Add the liquids. Pour in the whole milk, heavy cream, honey or maple syrup (if using), and vanilla extract. Don’t add the pudding mix yet.
- Blend until smooth. Pulse the blender a few times, then blend on medium speed for about 30 seconds. The mixture should be smooth and slightly thick, like a thin milkshake.
- Add the pudding mix. Sprinkle the sugar-free vanilla pudding mix over the top of the blended mixture. Add the pinch of salt. Blend again on low speed for about 15 seconds, just until the pudding mix is fully dissolved.
- Taste and adjust. Dip a clean spoon in and taste the base. If it’s not sweet enough, add a little more honey or maple syrup. Remember, freezing dulls sweetness, so it should taste slightly sweeter than you want the final ice cream to be.
- Pour into the pint container. Carefully pour the mixture into your Ninja Creami pint container. Leave about half an inch of headspace at the top. Put the lid on tight.
- Freeze for 24 hours. Place the pint container on a level surface in your freezer. Don’t stack anything on top of it. Let it freeze for at least 24 hours.
- Spin in the Ninja Creami. When your base is frozen solid, take the pint out of the freezer. Remove the lid and place it in the outer bowl of your Creami. Lock it into the machine. Select the ‘Ice Cream’ setting and let it do its thing.
- Check the texture. When the cycle finishes, lift the pint out and check the texture. It should look like soft-serve ice cream. If it’s still a little powdery or crumbly, use a spoon to scrape down the sides and press any chunks into the center, then run the ‘Re-spin’ cycle.
- Add mix-ins (optional). If you’re adding crushed wafers, nuts, or chocolate chips, now’s the time. Sprinkle them on top of the spun ice cream, then use a spoon to gently fold them in.
- Serve immediately or freeze for later. The ice cream will be soft-serve consistency right after spinning. If you want scoopable ice cream, transfer the pint to the freezer for about 30 minutes. If you’re storing it for later, press a piece of plastic wrap directly onto the surface of the ice cream before putting the lid on.
Notes
Use overripe bananas for maximum natural sweetness. Freeze the base for a full 24 hours before spinning. The re-spin cycle is your friend for perfect creamy texture. Always add mix-ins after spinning to avoid pulverization. For best texture, chill the base in the fridge for an hour before freezing.
Nutrition
- Serving Size: ½ cup
- Calories: 145
- Sugar: 9
- Sodium: 180
- Fat: 8
- Saturated Fat: 5
- Carbohydrates: 18
- Fiber: 1
- Protein: 3
Keywords: low sugar ice cream, banana pudding ice cream, Ninja Creami, healthy dessert, kid-friendly, low sugar, banana ice cream