I was sorting through a box of old kitchen things my aunt gave me, and I found a faded, handwritten note tucked inside a cookbook. It wasn’t a recipe, exactly. It was a list of instructions for drying orange slices, scribbled in pencil. I remember her telling me about it once, how she’d do it every winter just to make her kitchen look pretty and her tea taste better. She never made a big deal out of it—it was just something she did. Honestly, I think she was more interested in the quiet hour of slicing and arranging than the final product. That note sat on my counter for two weeks before I finally grabbed a bag of oranges and gave it a try. Maybe you’ve been there, staring at a bag of fruit that’s about to turn, wondering if you could do something, anything, besides just eating them.
This homemade oven-dried orange slices recipe is the direct result of that afternoon. I messed up the first batch—sliced them too thick, set the oven too high, and ended up with chewy, burnt-edged discs that looked nothing like the pretty things in my aunt’s note. But the second batch? That was the one. The kitchen smelled like a holiday candle, and the slices came out translucent, with that gorgeous stained-glass look when you hold them up to the light. I keep making them because they turn a regular Tuesday into something a little more special, and they cost almost nothing to make. It’s one of those small kitchen projects that feels like a secret weapon, and I’m happy to share it with you.
Why You’ll Love This Recipe
This isn’t just another garnish recipe. After testing this method about half a dozen times, I can tell you it’s the most reliable way to get beautifully dried, flavorful orange slices without any fuss. Here is why this particular method works so well for home cooks like us.
- Simple Ingredients: You only need oranges. That’s it. No fancy syrups, no special sugars, just fruit you can grab at any grocery store for a couple of dollars.
- Budget-Friendly: This is a fantastic way to use up oranges that are past their prime or on sale. You get a beautiful, useful product from something you might have thrown away.
- Easy to Make: The oven does all the hard work. Your job is just slicing and waiting. Perfect for a lazy Sunday afternoon or while you’re doing other things around the house.
- Long-Lasting: These slices keep for months when stored properly. Make a big batch now, and you’ll have gorgeous garnishes for cocktails, teas, and baking projects all season long.
- Versatile Uses: Cocktails, mocktails, teas, baked goods, gift tags, wreaths, potpourri—the list goes on. They are a true multi-purpose kitchen staple.
What makes this recipe different from others you might find online is the temperature and timing. I tried the high-heat shortcuts, and they just don’t work the same. The low-and-slow method I’m sharing here preserves the bright orange color and that concentrated, sweet-tart flavor. It’s not just another version—it’s the version that delivers consistent results every single time. The first time I pulled a tray of these out of the oven, I actually let out a little gasp. They were that pretty. This recipe turns a humble orange into something that looks like it came from a fancy kitchen supply catalog, and it feels good knowing you made it yourself.
What Ingredients You Will Need
The beauty of this recipe is its simplicity. You really only need one main ingredient, but the quality of that ingredient makes a big difference in the final result. Let’s break down what to look for.
- Oranges: The star of the show. You want oranges that are firm, heavy for their size, and have thin, unblemished skin. Navel oranges are my go-to because they are widely available, seedless, and have a great sweet-tart balance. Blood oranges work beautifully for a dramatic, deep red color, and Cara Cara oranges give a lovely pinkish hue. Valencia oranges are also excellent, especially when they are in season. Avoid oranges with very thick, puffy skin, as they take longer to dry and can be more bitter. I personally prefer organic oranges here since you are eating the peel, but conventional ones work fine if you wash them really well.
- Optional: Sugar or Cinnamon: While completely optional, a light dusting of granulated sugar or a sprinkle of ground cinnamon before baking can add a lovely sweet crust and extra aroma. If you are using them for cocktails, a sugar rim on the slice is a nice touch. For savory applications or simple tea, I usually leave them plain.
Ingredient Selection Tips: Look for oranges that feel heavy for their size—this indicates they are juicy and fresh. The skin should be bright and smooth, not wrinkled or soft. If you can, smell the orange. A strong, fragrant orange scent means it will be flavorful. I have had great luck with the store-brand navel oranges from my local grocery, but if you find a good deal at a farmers market, grab them. The variety of orange you choose will change the final color and flavor profile, so feel free to experiment.
Substitution Guidance: You are not limited to oranges! This exact same method works beautifully with lemons, limes, and grapefruits. Lemons and limes will dry a bit faster due to their thinner skins, so start checking them around the 2-hour mark. Grapefruit slices are gorgeous and have a slightly more bitter, complex flavor. You can even mix different citrus fruits on the same tray for a beautiful, colorful batch.
Equipment Needed
You don’t need a lot of fancy gear for this project, which is part of why I love it. Here is what you will need to get started.
- Sharp Knife or Mandoline: A sharp chef’s knife works perfectly fine, but a mandoline slicer is the real hero here. It gives you perfectly even slices, which is crucial for even drying. I use a basic, affordable mandoline, and it has paid for itself many times over. If you use a knife, just take your time and try to keep your slices as uniform as possible.
- Cutting Board: A stable cutting board is a must. A damp paper towel underneath will keep it from slipping.
- Baking Sheets: You will need one or two rimmed baking sheets. The rim is important to catch any juices that might drip.
- Parchment Paper or Silicone Baking Mats: This is non-negotiable. The slices will stick to a bare pan as they dry. Parchment paper or a silicone mat makes cleanup a breeze and prevents sticking. I prefer parchment for easy disposal.
- Paper Towels or Clean Kitchen Towels: For blotting the orange slices dry before baking. This step helps them dry faster and more evenly.
- Wire Cooling Rack (Optional but Helpful): Placing a wire rack on top of your baking sheet allows air to circulate underneath the slices, speeding up the drying process. It’s not required, but it does help.
- Airtight Container or Jar: For storing your finished, dried slices. A mason jar works perfectly.
Preparation Method
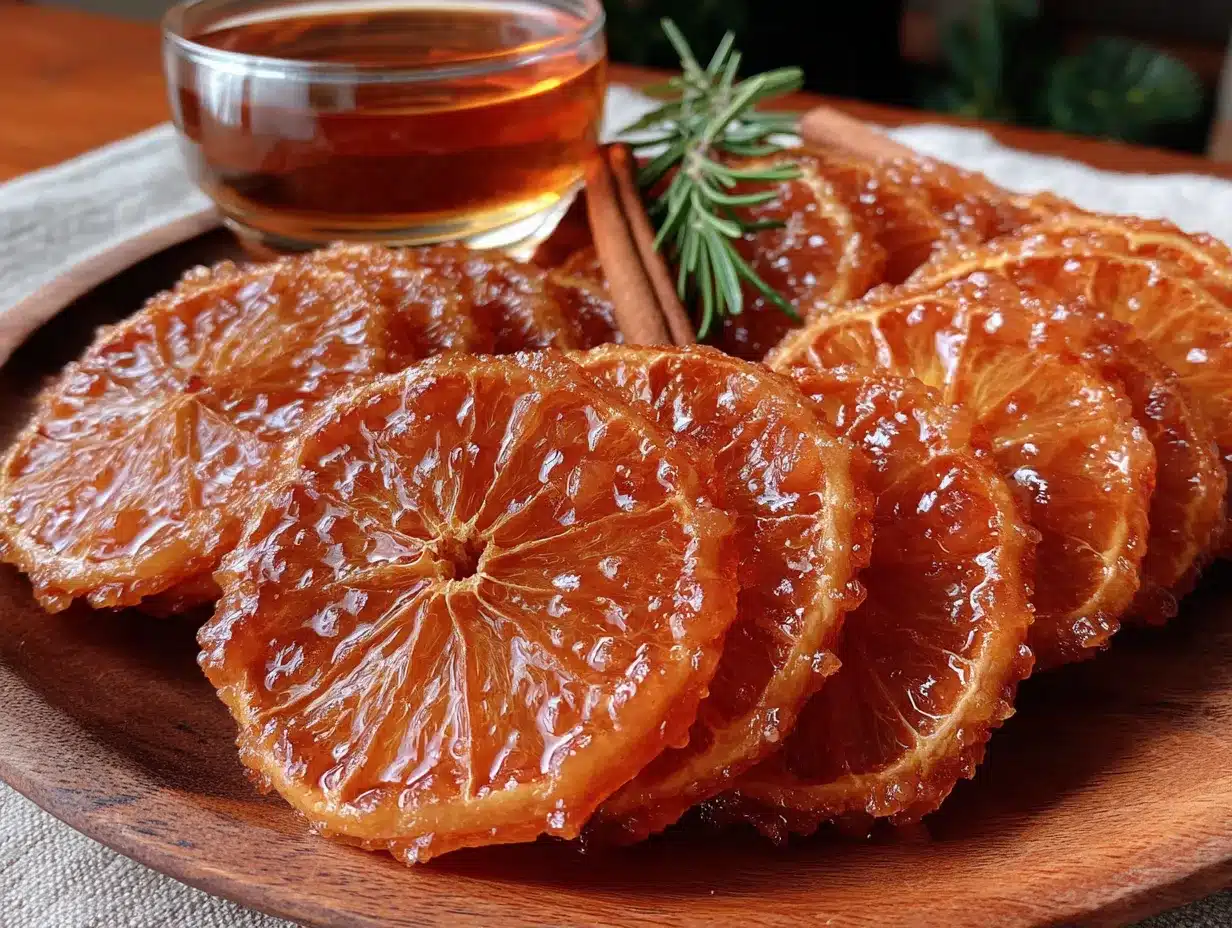
Alright, let’s get to the fun part. Follow these steps, and you will have beautiful, translucent orange slices in a few hours. The process is simple, but paying attention to the details makes all the difference.
- Preheat Your Oven: Set your oven to its lowest possible temperature. For most ovens, that is around 170°F (75°C) or 200°F (95°C). If your oven doesn’t go that low, you can prop the door open slightly with a wooden spoon handle to keep the temperature down. This gentle heat is what dries the slices without cooking them.
- Wash and Slice the Oranges: Scrub your oranges well under warm water to remove any wax or residue. Pat them dry. Using your sharp knife or mandoline, slice the oranges into even rounds, about 1/4-inch (6mm) thick. This thickness is the sweet spot—thin enough to dry well, but thick enough to hold their shape and not become brittle. If you slice them too thin, they will be fragile and may burn. Too thick, and they will take forever to dry and might not dry all the way through.
- Blot the Slices: Lay the orange slices out in a single layer on a clean kitchen towel or a few layers of paper towels. Place another towel on top and press down gently. You want to remove as much surface moisture as possible. This step is one I learned after my first soggy batch—it really does speed up the drying time and prevents the slices from steaming instead of drying.
- Arrange on Baking Sheets: Line your baking sheets with parchment paper or silicone mats. Place the orange slices in a single layer, making sure they are not touching each other. They need space for air to circulate. If they are crowded, they will trap moisture and take much longer to dry.
- Bake Low and Slow: Place the baking sheets in the preheated oven. Bake for 3 to 4 hours, depending on the thickness of your slices and your oven’s temperature. The goal is to dry them out, not to brown them. You will know they are done when they are dry to the touch, slightly leathery, and no longer sticky. They should be flexible but not moist. A good test is to press one in the center—it should feel firm and dry, not soft or tacky.
- Check and Rotate: About halfway through, rotate your baking sheets and flip each slice over. This ensures even drying. Some slices may dry faster than others, especially if they are on the edges of the pan. You can remove the smaller or thinner ones early if they are done.
- Cool Completely: Once the slices are dry, remove them from the oven and let them cool completely on the baking sheets. They will continue to firm up as they cool. Do not skip this step—they need to be fully cool before you store them.
Personal Tip: I like to set a timer for 2 hours and then start checking every 20 minutes after that. Every oven is different, and the perfect window can be narrow. The first time I made these, I forgot about them and ended up with some that were a bit too crunchy. They still worked for decoration, but they weren’t as nice for eating.
Cooking Tips & Techniques
Over the years, I’ve made plenty of mistakes with these slices, and I’ve learned a few things that make the process much smoother. Here are my best tips for perfect results every time.
- Even Slicing is Everything: This is the most important tip. If your slices are different thicknesses, they will finish drying at different times. Thin slices will burn, and thick slices will still be wet. Using a mandoline is the easiest way to get uniform slices, but if you are using a knife, take your time and aim for consistent thickness.
- Don’t Rush the Temperature: I know it’s tempting to turn the oven up to 300°F (150°C) to speed things up. Don’t do it. High heat will cook the oranges, turning them brown and making them taste bitter. The low-and-slow method is what preserves that beautiful color and sweet flavor. Patience is your friend here.
- Use a Wire Rack: If you have a wire cooling rack that fits on your baking sheet, use it. It lifts the slices off the pan, allowing hot air to circulate underneath. This cuts down on drying time by about 30 minutes and ensures the bottoms dry as evenly as the tops.
- Check for Doneness: The slices should feel dry and leathery, not crispy like a chip. They will still have a little bit of flexibility. When they cool, they will be firm but not brittle. If they snap when you bend them, they are over-dried. If they feel sticky or soft in the center, they need more time.
- My Biggest Failure: I once tried to dry a full tray of very thick slices, about 1/2-inch (12mm) thick. I thought I could just leave them in longer. After 6 hours, the edges were dark and burnt, and the centers were still gooey. I had to throw the whole batch away. It was a sad lesson in why thickness matters so much.
Variations & Adaptations
Once you master the basic technique, the possibilities are endless. Here are some of my favorite ways to change things up.
- Spiced Orange Slices: Before baking, lightly brush the slices with a little simple syrup (equal parts sugar and water, dissolved) and sprinkle them with a mix of cinnamon, cloves, and star anise powder. This creates a beautiful, fragrant slice that is perfect for holiday cocktails or mulled wine.
- Sweetened Citrus Slices: For a sweeter snack or garnish, dip the raw slices in a bowl of granulated sugar on both sides before placing them on the baking sheet. The sugar will crystallize as they dry, giving them a lovely sparkly finish and a sweet crunch. This works wonderfully for blood oranges and lemons.
- Dried Citrus for Tea: If you plan to use the slices primarily for tea, slice them a little thinner, about 1/8-inch (3mm). They will dry faster and infuse into hot water more quickly. You can also add a few slices of fresh ginger or a cinnamon stick to the same tray for a custom tea blend.
- Dehydrator Method: If you own a dehydrator, this is actually the best method. Arrange the slices in a single layer on the dehydrator trays and set the temperature to 135°F (57°C). They will be perfectly dry in about 6 to 8 hours. The dehydrator gives the most even results and frees up your oven.
Serving & Storage Suggestions
These dried orange slices are incredibly versatile. Here is how to use them and keep them fresh for months.
Serving Suggestions: Use them as a stunning garnish for cocktails like an Old Fashioned, Negroni, or a simple gin and tonic. Float one in a cup of hot tea or a glass of iced tea. They are beautiful on top of cakes, cupcakes, or a simple yogurt parfait. You can even string them with a needle and thread to make a natural, fragrant garland for your kitchen or holiday tree. For a quick and elegant gift, tie a few slices with a ribbon and attach them to a bottle of homemade simple syrup or a jar of honey.
Storage Instructions: Once the slices are completely cool, store them in an airtight container. A glass jar with a tight-fitting lid works perfectly. Keep them in a cool, dark, dry place, like your pantry. They will last for up to 6 months this way. Make sure there is no moisture in the container, or they can get moldy. If you notice any softness, you can pop them back in a low oven (170°F / 75°C) for 20 minutes to re-crisp them.
How Flavors Develop: Over time, the flavor of the dried slices becomes more concentrated and intense. The sweetness deepens, and the tartness becomes more pronounced. The color may also fade slightly, but they will still be beautiful. I actually prefer the flavor of slices that have been stored for a few weeks—they seem to mellow and become more complex.
Nutritional Information & Benefits
While these are used mostly as a garnish, they do retain some of the nutritional benefits of fresh oranges. Here is a quick look.
Estimated Nutritional Values (per slice): A single dried orange slice (about 1/4 of an orange) contains approximately 15-20 calories, 4g of carbohydrates, 1g of fiber, and a good dose of Vitamin C. The drying process concentrates the natural sugars, so the sugar content is higher by weight than a fresh slice, but you are using such a small amount that it is negligible.
Health Benefits: Oranges are well-known for their high Vitamin C content, which supports immune health. They also contain fiber, particularly in the pith, which is good for digestion. The peels are rich in antioxidants and flavonoids, which have anti-inflammatory properties. Eating the whole slice, including the peel, gives you the most benefit.
Dietary Considerations: These slices are naturally gluten-free, vegan, dairy-free, and nut-free. They are a great, clean ingredient for almost any diet. If you are watching your sugar intake, be mindful that the drying process concentrates the natural sugars, so use them sparingly.
Conclusion
I hope you give these homemade oven-dried orange slices a try. They are one of those little kitchen projects that feels like a secret superpower. With just a few oranges and some patience, you can create something that looks beautiful, tastes great, and makes everything feel a little more special. Whether you are dressing up a cocktail for a dinner party or just want to make your afternoon tea feel fancy, these slices are the perfect touch.
I would love to hear how they turn out for you. What kind of oranges did you use? Did you add any spices? Drop a comment below and let me know. And if you have a friend who loves making cocktails or just enjoys pretty things in the kitchen, share this recipe with them. Happy drying, and enjoy every beautiful, fragrant slice!
Frequently Asked Questions
Can I use a microwave or air fryer to dry orange slices?
You can use an air fryer, but the results are less consistent than the oven. Set your air fryer to the lowest temperature (usually around 170°F or 75°C) and check them every 30 minutes. They will dry faster, but they can also burn more easily. I do not recommend the microwave, as it will cook the slices rather than dry them, resulting in a chewy, unappealing texture.
Why are my orange slices turning brown?
Browning usually happens when the oven temperature is too high. The natural sugars in the oranges caramelize and burn, turning them brown. Stick to the low temperature (170°F to 200°F / 75°C to 95°C) and make sure your slices are even in thickness. If your oven runs hot, prop the door open slightly with a wooden spoon handle to keep the temperature down.
How do I know when the orange slices are fully dried?
They should feel dry to the touch, leathery, and slightly flexible. They should not be sticky or moist in the center. A good test is to let one cool completely and then try to bend it. It should bend slightly without breaking. If it snaps, it is over-dried. If it feels soft or tacky, it needs more time in the oven.
Can I eat the dried orange slices?
Absolutely! They are completely edible, including the peel. The drying process concentrates the flavor, making them sweet and slightly tart with a pleasant chewy texture. They are delicious on their own as a snack, added to trail mix, or used in baking. Just be aware that the peel can be a bit tough if the slices are on the thicker side.
How long do homemade dried orange slices last?
When stored properly in an airtight container in a cool, dark, dry place, they will last for 6 to 12 months. Make sure they are completely cool and dry before storing them to prevent mold. If you notice any softness or moisture in the container, you can re-dry them in a low oven for about 20 minutes to extend their shelf life.
Pin This Recipe!

Homemade Oven-Dried Orange Slices: Easy Garnish Recipe

Learn how to make beautiful, translucent oven-dried orange slices with this easy recipe. Perfect for garnishing cocktails, teas, and baked goods, these slices are budget-friendly and long-lasting.
- Prep Time: 15 minutes
- Cook Time: 3 hours 30 minutes
- Total Time: 3 hours 45 minutes
- Yield: 4 servings
- Category: Garnish
- Cuisine: American
Ingredients
- Oranges (Navel, Blood, Cara Cara, or Valencia; organic preferred)
- Optional: Granulated sugar or ground cinnamon for dusting
Instructions
- Preheat your oven to its lowest possible temperature, around 170°F (75°C) or 200°F (95°C). If your oven doesn’t go that low, prop the door open slightly with a wooden spoon handle.
- Wash the oranges well under warm water to remove any wax or residue. Pat them dry.
- Using a sharp knife or mandoline, slice the oranges into even rounds, about 1/4-inch (6mm) thick.
- Lay the orange slices in a single layer on a clean kitchen towel or paper towels. Place another towel on top and press down gently to remove surface moisture.
- Line baking sheets with parchment paper or silicone baking mats. Arrange the orange slices in a single layer, making sure they are not touching each other.
- Bake for 3 to 4 hours, depending on thickness and oven temperature. The slices are done when they are dry to the touch, slightly leathery, and no longer sticky.
- About halfway through, rotate the baking sheets and flip each slice over for even drying.
- Remove from the oven and let the slices cool completely on the baking sheets before storing.
Notes
For best results, use a mandoline for even slices. Avoid high heat to prevent browning. Check slices after 2 hours and every 20 minutes thereafter. Store in an airtight container in a cool, dark, dry place for up to 6 months.
Nutrition
- Serving Size: 1 slice
- Calories: 1520
- Sugar: 3
- Carbohydrates: 4
- Fiber: 1
Keywords: dried orange slices, oven-dried oranges, citrus garnish, homemade garnish, easy recipe, budget-friendly, long-lasting, versatile