It was 11:47 PM on a random Wednesday in mid-October, and I had a very specific craving for something that felt like autumn but tasted like childhood. I didn’t have any Halloween cookie cutters — not a single bat, ghost, or pumpkin — but I had a bag of black cocoa powder I’d bought on a whim last spring and a jar of orange gel food coloring that was collecting dust. And the idea that arrived, somewhere between my third cup of tea and a half-hearted scroll through Pinterest, was this: what if I made sugar cookies that actually looked like Halloween? Not just decorated like it, but baked that way from the start. I mean, honestly, the late hour made everything feel possible. I wasn’t thinking about rules or what “should” work. I was just mixing, tasting, and trusting my gut. The kitchen was quiet except for the hum of the oven, and let me tell you — that first batch came out looking like tiny edible jack-o’-lanterns and midnight shadows. Maybe you’ve been there, standing in your kitchen at an hour that feels more like limbo than a time, just wanting to make something that captures a feeling. That’s how this recipe was born. And honestly? I keep making it because it tastes like that night — impulsive, a little messy, and exactly right.
Why You’ll Love This Recipe
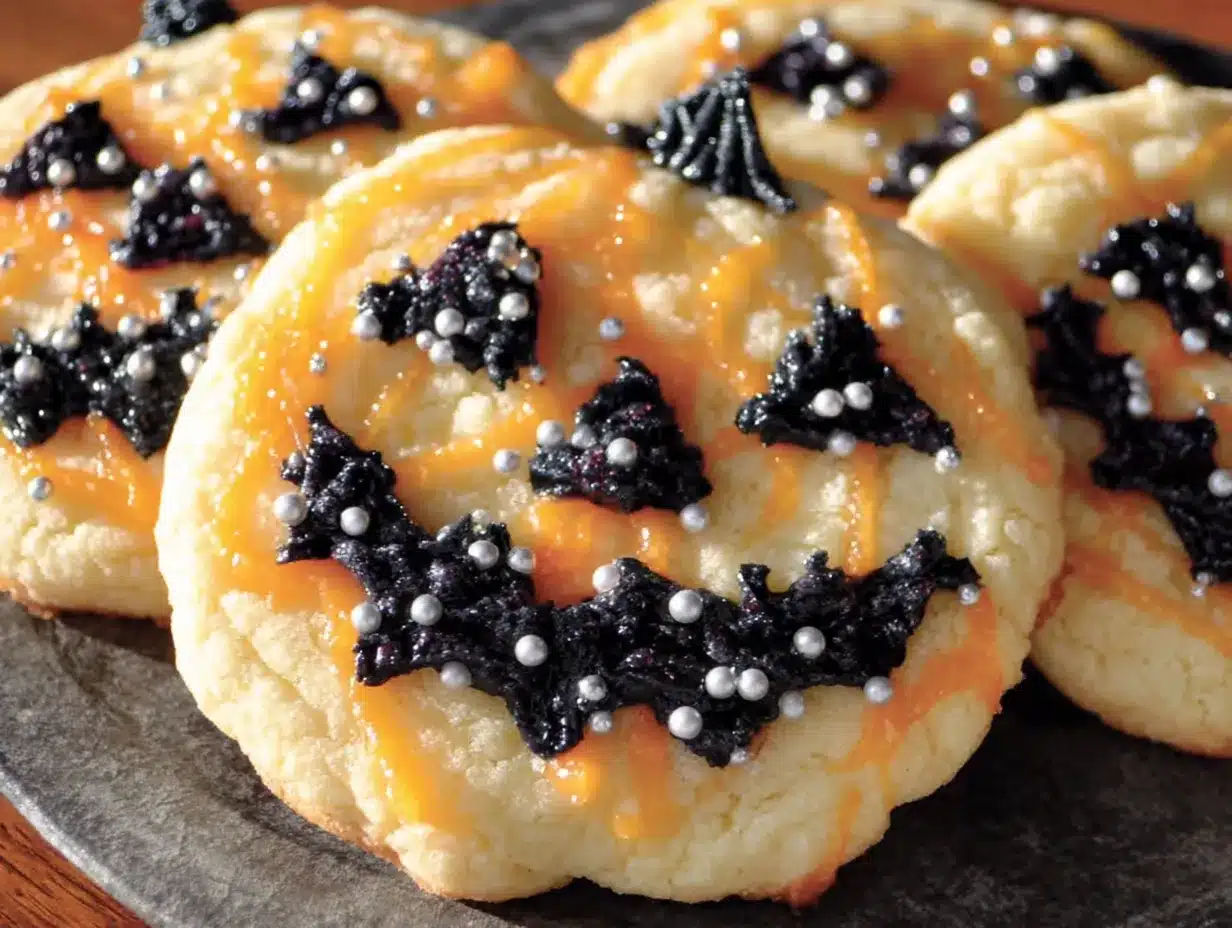
These aren’t your average sugar cookies. The black ones get their deep, dark color from black cocoa powder — the same stuff that gives Oreos their signature look — while the orange dough gets its vibrant hue from natural food coloring and a touch of turmeric for warmth. Together, they create a spooky, striking contrast that screams Halloween without any fancy decorating skills required.
- No Special Cutters Needed : You can roll, slice, or shape these by hand. No bats or ghosts required.
- Simple Pantry Ingredients : Butter, sugar, flour, eggs — the usual suspects. The black cocoa and food coloring are the only “special” items.
- Perfect for Halloween Parties : Bring a batch to any gathering and watch them disappear. Kids and adults both go crazy for the two-tone effect.
- Bold Flavor That Matches the Look : The black cocoa adds a subtle, almost malted chocolate flavor that balances the sweet vanilla base. It’s not just a gimmick.
- Make-Ahead Friendly : The dough freezes beautifully, so you can prep weeks before Halloween and bake fresh when you need them.
What makes this recipe different from every other sugar cookie out there? It’s the way the colors are baked in, not painted on. No waiting for icing to dry, no messy piping bags. You get two distinct doughs that come together in one gorgeous, spooky cookie. I’ve tested this at least a dozen times to get the texture just right — soft in the center, slightly crisp at the edges, and so satisfying to bite into. I mean, the first time I pulled a tray out of the oven and saw those orange and black swirls, I actually laughed out loud. It’s that kind of recipe — the one that makes you feel like a kitchen wizard, even at 11 PM on a Tuesday.
What Ingredients You Will Need
This recipe uses simple, wholesome ingredients to deliver bold flavor and satisfying texture without the fuss. Most of these are pantry staples, and the few specialty items are easy to find online or at well-stocked grocery stores. Here’s everything you’ll need, broken down by dough color.
For the Base Sugar Cookie Dough (Makes both colors)
- 1 cup (226g) unsalted butter, softened to room temperature (I prefer Kerrygold for its rich flavor, but any good-quality butter works)
- 1 cup (200g) granulated sugar
- 1 large egg, room temperature
- 1 teaspoon vanilla extract (use pure, not imitation — it makes a difference)
- 2 cups (250g) all-purpose flour, spooned and leveled
- ½ teaspoon baking powder
- ¼ teaspoon salt
For the Black Dough
- ¼ cup (25g) black cocoa powder (I recommend Rodelle or King Arthur Flour brands for the deepest color)
- 1-2 tablespoons milk, as needed to adjust consistency
Black cocoa powder is the secret weapon here. It’s different from regular cocoa — it’s Dutch-processed and alkalized, which gives it that jet-black color and a milder, almost Oreo-like flavor. Don’t substitute with regular cocoa powder; it won’t give you the same dramatic result.
For the Orange Dough
- Orange gel food coloring (I use Americolor Super Red mixed with a tiny bit of Lemon Yellow to get that perfect pumpkin orange)
- ½ teaspoon ground turmeric (optional, but it deepens the orange naturally and adds a warm undertone)
- 1-2 tablespoons milk, as needed to adjust consistency
Gel food coloring is key here. Liquid drops won’t give you the same vibrant color without thinning out the dough too much. If you’re avoiding artificial colors, you can use natural orange coloring from brands like Color Kitchen, though the shade will be slightly more muted.
Equipment Needed
You don’t need a professional bakery setup for these cookies, but a few tools will make your life much easier.
- Stand mixer or hand mixer : Creaming the butter and sugar properly is crucial for the right texture. I’ve made these with both, and honestly, my ancient hand mixer works just fine.
- Two large mixing bowls
- Plastic wrap : For chilling the dough — don’t skip this step
- Baking sheets : Light-colored metal sheets give the most even browning. Dark sheets can make the bottoms too dark.
- Parchment paper or silicone baking mats
- Rolling pin (optional) : If you want to roll and cut shapes, you’ll need one. But you can also just shape the dough into logs and slice.
- Sharp knife or bench scraper : For clean cuts if making slice-and-bake cookies
- Cooling rack
I’ve made these cookies in a tiny apartment kitchen with a hand mixer that sounded like it was dying, and they still came out perfect. So don’t stress if you’re missing something — improvisation is part of the fun.
Preparation Method
This method makes about 24-30 cookies, depending on how thick you cut them. Total time is about 2 hours, including chilling.
Step 1: Make the Base Dough (15 minutes)
In your mixing bowl, cream together the softened butter and granulated sugar until light and fluffy — about 3-4 minutes. You want it to look pale and almost whipped. Scrape down the sides of the bowl, then add the egg and vanilla extract. Beat until fully combined. In a separate bowl, whisk together the flour, baking powder, and salt. Gradually add the dry ingredients to the wet mixture, mixing on low speed until just combined. Do not overmix, or your cookies will be tough. The dough should be soft but not sticky.
Step 2: Divide and Color the Dough (10 minutes)
Divide the dough evenly into two bowls — about 300 grams each. To one bowl, add the black cocoa powder and 1 tablespoon of milk. Mix on low speed until the cocoa is fully incorporated and the dough turns a deep, dark black. If it seems too dry, add the second tablespoon of milk. To the other bowl, add the orange gel food coloring (start with a small amount and add more until you reach your desired shade) and the turmeric, if using. Mix until the color is even throughout. Again, add milk a tablespoon at a time if the dough feels too stiff.
Step 3: Chill the Dough (30 minutes minimum)
Flatten each dough into a disk, wrap tightly in plastic wrap, and refrigerate for at least 30 minutes. This step is non-negotiable — warm dough is sticky dough, and you’ll have a mess on your hands. I once skipped this step because I was impatient, and let me tell you, the cookies spread into sad, muddy puddles. Learn from my mistakes.
Step 4: Assemble the Cookies (20 minutes)
There are a few ways to combine the two doughs. Here’s my favorite: roll each chilled dough into a rectangle about ½-inch thick. Place the orange rectangle on top of the black one, then roll them up together like a jelly roll. Wrap the log in plastic wrap and chill for another 20 minutes. Alternatively, you can roll both doughs into long snakes and twist them together for a marbled effect. Or simply roll small balls of each color and press them together — whatever feels right to you.
Step 5: Slice and Bake (12-15 minutes)
Preheat your oven to 350°F (175°C). Line your baking sheets with parchment paper. Remove the dough log from the fridge and slice into ¼-inch thick rounds. Place them about 2 inches apart on the prepared sheets — they will spread a little. Bake for 12-14 minutes, or until the edges are just set and the bottoms are lightly golden. The centers will look slightly underdone; that’s perfect. Let them cool on the baking sheet for 5 minutes, then transfer to a cooling rack. The cookies will continue to set as they cool.
Cooking Tips & Techniques
I’ve made these cookies more times than I can count, and I’ve learned a few things the hard way. Here’s what I wish someone had told me.
Don’t overwork the dough. The more you handle it, the tougher the cookies get. Mix until just combined, and handle the dough as little as possible when shaping. I speak from experience — my first batch was more suitable for building a house than eating.
Chill, chill, chill. If at any point the dough feels too soft or sticky, pop it back in the fridge for 10 minutes. Warm dough is the enemy of clean, defined colors. I keep a bowl of ice water nearby to cool my hands if the dough starts warming up from my touch.
Use a sharp knife for slicing. A dull blade will smush the dough and blur the color contrast. I use a bench scraper for the cleanest cuts, but a serrated knife works in a pinch — just use a gentle sawing motion.
Watch the oven like a hawk. These cookies go from perfectly baked to overdone in about 60 seconds. Pull them out when the edges are just set and the centers still look slightly soft. They’ll continue cooking on the hot baking sheet.
If your colors bleed together, your dough was too warm or you overmixed. Don’t worry — they’ll still taste amazing. Sometimes the “muddled” ones look like spooky storm clouds, which is actually kind of perfect for Halloween.
Variations & Adaptations
One of the best things about this recipe is how flexible it is. Here are some ways to make it your own.
Vegan Version : Substitute the butter with vegan butter (I like Miyoko’s), use a flax egg (1 tablespoon ground flaxseed mixed with 3 tablespoons water), and swap the milk for any plant-based option. The texture will be slightly less tender, but the flavor is still fantastic.
Gluten-Free Option : Use a 1:1 gluten-free flour blend that contains xanthan gum. I’ve had good results with Bob’s Red Mill. Add an extra tablespoon of milk if the dough seems too dry.
Spiced Orange Version : Add 1 teaspoon of pumpkin pie spice to the orange dough for a fall flavor boost. It pairs beautifully with the black cocoa.
Purple & Green Halloween : Swap the orange for purple and the black for green for a witchy, monster-themed twist. Use purple gel coloring and matcha powder for green.
Filled Cookies : Sandwich a small amount of orange marmalade or chocolate ganache between two cookies for an extra-special treat. I tried this last year and it was a game-changer.
Serving & Storage Suggestions
These cookies are best served at room temperature, straight from the cooling rack. They’re perfect on their own, but I love pairing them with a glass of cold milk or a warm mug of spiced apple cider. For a Halloween party, arrange them on a platter with some candy corn and mini pumpkins for a gorgeous display.
Storage : Keep the cookies in an airtight container at room temperature for up to 5 days. Layer them between sheets of parchment paper to prevent sticking. The flavor actually improves after a day or two — the black cocoa mellows out and the vanilla becomes more pronounced.
Freezing : You can freeze the baked cookies for up to 3 months. Wrap them tightly in plastic wrap and then foil. Thaw at room temperature for about 30 minutes before serving. Alternatively, freeze the unbaked dough logs for up to 2 months. When you’re ready to bake, slice them straight from the freezer (you might need to let them sit for 5 minutes) and add 1-2 minutes to the baking time.
Nutritional Information & Benefits
Per cookie (based on 30 cookies): approximately 130 calories, 7g fat, 16g carbohydrates, 1.5g protein, 9g sugar. These numbers are estimates and will vary based on your specific ingredients.
While these are definitely a treat, there are a few redeeming qualities. The black cocoa powder is rich in antioxidants — more so than regular cocoa — and the turmeric in the orange dough has anti-inflammatory properties. Plus, you’re using real butter and eggs, not preservatives or artificial stabilizers. I always say: homemade treats are better for you than anything from a package, even if they’re still cookies.
If you’re watching your sugar intake, you can reduce the sugar to ¾ cup without significantly affecting the texture. The cookies will be slightly less sweet but still delicious.
Conclusion
These Spooky Orange & Black Sugar Cookies are more than just a Halloween treat — they’re a little piece of kitchen magic. The way the two colors swirl together, the deep cocoa flavor, the soft-baked texture that melts in your mouth — it all adds up to something special. I’ve made these for Halloween parties, classroom treats, and quiet nights in, and they never fail to bring a smile. The best part? You can make them your own. Change the colors, add some spice, or just stick with the original — there’s no wrong way to do it. I’d love to hear how yours turn out. Drop a comment below and let me know what combination you tried, or tag me in your photos on social media. Happy Halloween, and happy baking!
Frequently Asked Questions
Can I use regular cocoa powder instead of black cocoa?
You can, but the color won’t be as deep. Regular cocoa will give you a dark brown dough, not black. If that’s all you have, add a teaspoon of black gel food coloring to darken it.
Why did my cookies spread too much?
Your dough was likely too warm when it went into the oven. Make sure you chill it thoroughly, and don’t skip the second chill after shaping. Also, check that your butter wasn’t too soft when you started.
Can I make these cookies without food coloring?
Absolutely. For the orange, use extra turmeric (about 1 teaspoon) for a natural yellow-orange. For the black, use black cocoa powder — it’s naturally black. The colors will be more muted, but they’ll still look festive.
How do I get a cleaner color separation?
Chill the dough thoroughly between each step. Work quickly when combining the colors, and use a sharp knife for slicing. If the colors start to blur, pop the log back in the fridge for 15 minutes.
Can I use this recipe for cut-out cookies?
Yes! Roll the chilled dough to ¼-inch thickness and use Halloween-shaped cookie cutters. Just keep the dough cold — if it warms up, the shapes will lose their definition. Bake as directed.
Pin This Recipe!

Easy Black & Orange Halloween Sugar Cookies Recipe
These spooky sugar cookies get their deep black color from black cocoa powder and vibrant orange from natural food coloring and turmeric, creating a striking Halloween treat without any fancy decorating skills required.
- Prep Time: 30 minutes
- Cook Time: 14 minutes
- Total Time: 2 hours
- Yield: 24-30 cookies 1x
- Category: Dessert
- Cuisine: American
Ingredients
- 1 cup (226g) unsalted butter, softened to room temperature
- 1 cup (200g) granulated sugar
- 1 large egg, room temperature
- 1 teaspoon vanilla extract (pure)
- 2 cups (250g) all-purpose flour, spooned and leveled
- ½ teaspoon baking powder
- ¼ teaspoon salt
- ¼ cup (25g) black cocoa powder
- 1–2 tablespoons milk (for black dough)
- Orange gel food coloring (Americolor Super Red mixed with Lemon Yellow)
- ½ teaspoon ground turmeric (optional, for orange dough)
- 1–2 tablespoons milk (for orange dough)
Instructions
- In a mixing bowl, cream together the softened butter and granulated sugar until light and fluffy, about 3-4 minutes. Scrape down the sides, then add the egg and vanilla extract. Beat until fully combined.
- In a separate bowl, whisk together the flour, baking powder, and salt. Gradually add the dry ingredients to the wet mixture, mixing on low speed until just combined. Do not overmix.
- Divide the dough evenly into two bowls (about 300 grams each). To one bowl, add the black cocoa powder and 1 tablespoon of milk. Mix until fully incorporated and the dough turns deep black. Add more milk if needed.
- To the other bowl, add the orange gel food coloring (start with a small amount and add more until desired shade) and the turmeric (if using). Mix until the color is even. Add milk a tablespoon at a time if the dough feels too stiff.
- Flatten each dough into a disk, wrap tightly in plastic wrap, and refrigerate for at least 30 minutes.
- Roll each chilled dough into a rectangle about ½-inch thick. Place the orange rectangle on top of the black one, then roll them up together like a jelly roll. Wrap the log in plastic wrap and chill for another 20 minutes.
- Preheat oven to 350°F (175°C). Line baking sheets with parchment paper.
- Remove the dough log from the fridge and slice into ¼-inch thick rounds. Place them about 2 inches apart on the prepared sheets.
- Bake for 12-14 minutes, or until the edges are just set and the bottoms are lightly golden. The centers will look slightly underdone.
- Let the cookies cool on the baking sheet for 5 minutes, then transfer to a cooling rack.
Notes
Chill the dough thoroughly between each step to prevent colors from bleeding. Use a sharp knife for clean slices. Watch the oven closely as cookies can go from perfectly baked to overdone quickly. If colors bleed, the dough was too warm or overmixed.
Nutrition
- Serving Size: 1 cookie
- Calories: 130
- Sugar: 9
- Sodium: 50
- Fat: 7
- Saturated Fat: 4
- Carbohydrates: 16
- Fiber: 0.5
- Protein: 1.5
Keywords: Halloween cookies, sugar cookies, black cocoa, orange cookies, spooky cookies, no cutter cookies, slice and bake


