My brother swore he hated Halloween. For years. Since we were kids, really. He’d grumble about the doorbell ringing, complain about the candy mess, and hide in his room with a movie every October 31st. Then, last year, I caught him. I was in the kitchen, layering crushed cookies into these little cups for a neighborhood party, and I heard footsteps. He stood in the doorway, arms crossed, trying to look annoyed. But his eyes were fixed on the pudding. “What is that?” he asked, his voice cracking just a little. I didn’t say a word. I just handed him a spoon and one of the cups. He took a bite. Then another. Then he sat down at the table and finished the whole thing. He didn’t say he liked it, but he didn’t have to. The empty cup said it all.
That was the moment I knew these Cozy Spooky Graveyard Dirt Pudding Cups were something special. They’re not just a dessert; they’re a peace offering. A way to get even the biggest Halloween scrooge to crack a smile. The best part? They’re almost too easy to make. You don’t need a fancy mixer or any baking skills. It’s really just about layering things and having a little fun with the decorations. Honestly, the hardest part is not eating all the crushed cookies before you get them into the cups.
I mean, let’s be real. Most Halloween treats are either way too complicated or just pure sugar bombs that leave you feeling weird. These cups are different. They’re creamy, they’re crunchy, and they have that perfect balance of chocolate and cream. Plus, you get to make little graveyard scenes with gummy worms and cookie tombstones. It’s the kind of project that makes you feel like a kid again, even if you’re just making them for yourself on a quiet, chilly evening. Maybe you’ve been there, staring at a Pinterest board full of elaborate cakes and feeling your soul drain. These cups are the antidote to that. They’re proof that you don’t have to be a pastry chef to make something that looks and tastes amazing. And honestly, the look on my brother’s face was worth every single crumb.
Why You’ll Love This Recipe
Listen, I’ve tested a lot of pudding cup recipes in my time. Some were too runny, some were too sweet, and some just didn’t have that satisfying crunch. These Cozy Spooky Graveyard Dirt Pudding Cups are the ones I keep coming back to, and here’s why I think you’ll feel the same way.
- Quick & Easy : This comes together in under 20 minutes of active time. No baking, no complicated steps. Just mix, layer, and chill. Perfect for last-minute Halloween parties or a fun Friday night project with the kids.
- Simple Ingredients : You probably have most of these in your pantry right now. Instant pudding mix, milk, Oreos, and some cream cheese. No trips to a specialty baking store required.
- Perfect for Halloween : Whether it’s a classroom party, a spooky movie night, or just a cozy evening at home, these cups fit the vibe perfectly. They’re festive without being over-the-top.
- Crowd-Pleaser : I’ve served these to kids, adults, and even my brother who supposedly hates Halloween. They disappear every single time. The creamy texture and crunchy cookie layer are a guaranteed hit.
- Unbelievably Delicious : The secret is the cream cheese. It adds a slight tang and a velvety richness that takes the pudding from “good” to “I can’t stop eating this.” It’s the texture and flavor combo that makes this real comfort food.
What makes this version different from all the other dirt pudding recipes out there? It’s the attention to detail. I spent a lot of time getting the pudding-to-cookie ratio just right. Too many cookies and it’s dry; too much pudding and it’s a soupy mess. This recipe has that perfect balance where every spoonful gives you a bit of everything. It’s also incredibly forgiving. You can use any flavor of pudding you like, swap out the Oreos for gluten-free cookies, or add a layer of fresh fruit if you’re feeling fancy.
This recipe isn’t just good—it’s the kind that makes you close your eyes after the first bite. It’s comfort food reimagined for a spooky season. It’s faster than baking a cake, but it gives you that same soul-soothing satisfaction. Perfect for impressing your Halloween guests without any stress, or turning a simple Tuesday night into something memorable.
What Ingredients You Will Need
This recipe uses simple, mostly pantry-staple ingredients to create a dessert that feels both nostalgic and a little bit fancy. The magic really happens when you combine the creamy pudding with the crunchy cookie “dirt.” Let’s break down what you’ll need.
For the Creamy Pudding Base
- 1 package (3.9 oz) instant chocolate pudding mix – I prefer the Jell-O brand for its consistent texture, but any brand works. Make sure it’s the “instant” kind, not the cook-and-serve, or your chilling time will be way longer.
- 2 cups cold whole milk – Whole milk gives you the richest, creamiest pudding. You can use 2%, but it won’t be quite as luxurious. For a dairy-free version, use full-fat oat milk or canned coconut milk (the kind in a carton, not the can).
- 4 oz cream cheese, softened – This is my secret weapon. It adds a subtle tang and a thick, velvety texture that regular pudding just doesn’t have. Make sure it’s truly softened to room temperature to avoid lumps.
- 1/4 cup powdered sugar – This helps sweeten the cream cheese just a touch and keeps the mixture silky smooth. Granulated sugar would leave a gritty texture.
- 1/2 teaspoon vanilla extract – A good quality vanilla, like Nielsen-Massey, really brightens the flavor and rounds out the chocolate.
For the Cookie “Dirt” & Assembly
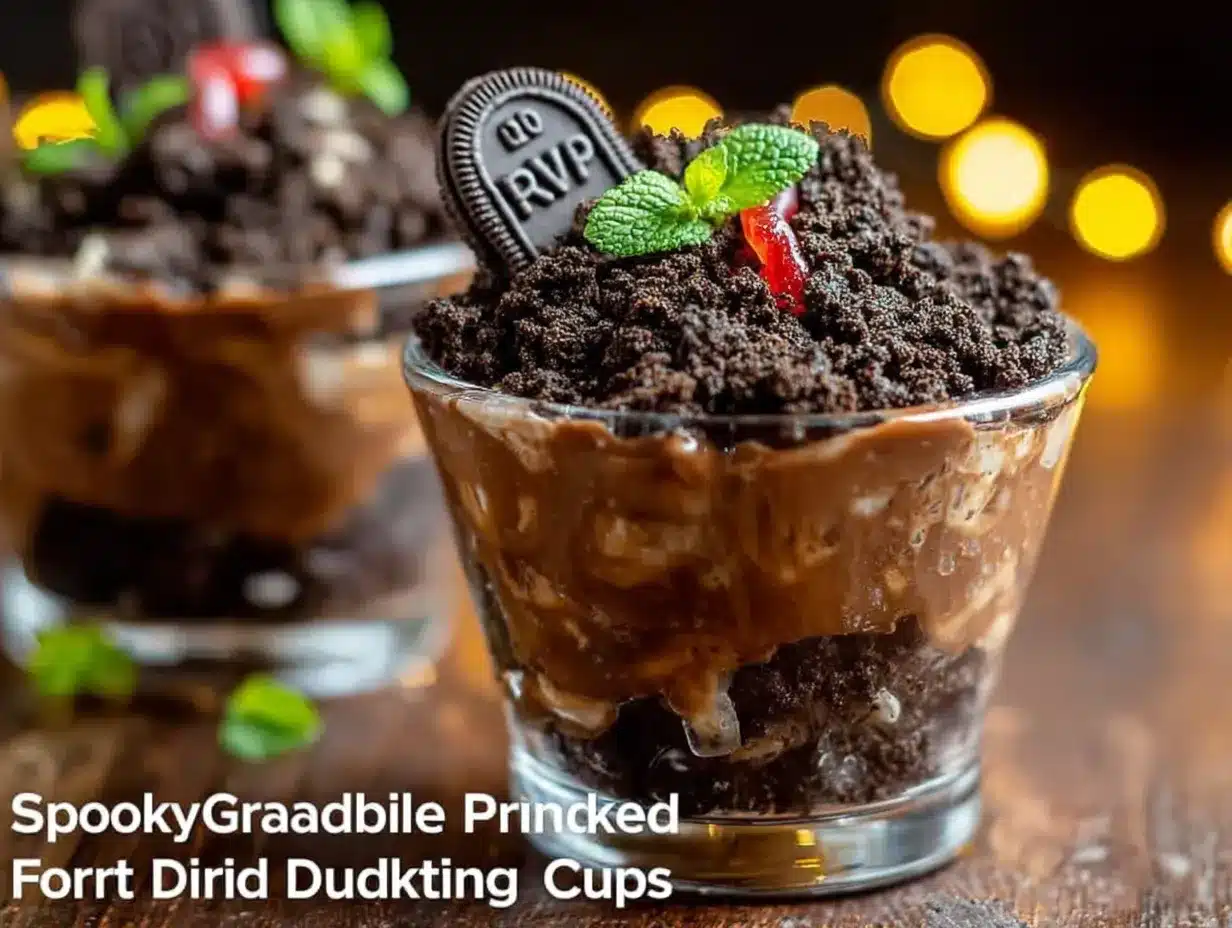
- 1 standard package (about 14 oz) Oreo cookies – You’ll need the whole package, including the cream filling. The filling helps the crumbs stick together and gives them that perfect, slightly clumpy “dirt” texture. Don’t scrape it out!
- 1 cup heavy whipping cream – This is for the whipped topping. You can use a store-bought tub of Cool Whip if you’re in a hurry, but homemade whipped cream is so much better. It’s lighter, fluffier, and has a cleaner taste.
- 2 tablespoons powdered sugar – For sweetening the whipped cream.
For the Spooky Graveyard Decorations
- Gummy worms – The classic choice. I like the sour ones for a little extra zing. You can find them at any grocery store or dollar store.
- Chocolate wafer cookies or Milano cookies – These will be your tombstones. You can also use rectangular shortbread cookies. Look for something that stands up straight.
- Black decorating gel or icing – For writing “RIP” or spooky messages on the tombstones. A small tube from the baking aisle works perfectly.
- Optional: Candy pumpkins, skeleton bones, or sprinkles – These add extra visual fun. I sometimes add a few candy pumpkins to look like little gourds growing on the grave.
Ingredient Selection Tips: When choosing your Oreos, look for a package that isn’t completely crushed. You want whole cookies so you can control the crumb size. For the cream cheese, the full-fat block style is best. The spreadable kind in a tub has too much water and air, which can make your pudding runny.
Substitution Guidance: If you need this to be gluten-free, use gluten-free chocolate sandwich cookies (like Glutino or Kinnikinnick). For a lower sugar option, you can use sugar-free pudding mix and sugar-free cookies, but the texture will be slightly different. You can also swap the chocolate pudding for vanilla or butterscotch for a different flavor profile.
Equipment Needed
You don’t need a lot of fancy tools for this recipe, which is part of its charm. Here’s what you’ll need to get the job done.
- Food processor or zip-top bag and rolling pin – For crushing the Oreos. A food processor gives you the most consistent, fine crumb. If you don’t have one, put the cookies in a large zip-top bag and go to town with a rolling pin. It’s a great way to get out some frustration!
- Electric hand mixer or stand mixer – For whipping the cream and beating the cream cheese. A hand mixer is perfectly fine. I’ve made this with a whisk before, and it works, but your arm will be tired.
- Large mixing bowls – You’ll need at least two: one for the pudding mixture and one for the whipped cream.
- Small clear plastic or glass cups – These are essential for the “graveyard” look. I like using 8-ounce plastic cups from the party store because they’re cheap and disposable. Glass dessert cups or mason jars also work beautifully. You want to see the layers.
- Spatula – For folding the whipped cream into the pudding and for scraping every last bit of goodness out of the bowl.
- Measuring cups and spoons – For accuracy, especially with the milk and heavy cream.
Budget-Friendly Options: Don’t have a food processor? No problem. The zip-top bag method works just as well. You can also use a butter knife to spread the cream cheese instead of a mixer, just make sure it’s very soft. For the cups, I’ve used old jam jars and even small bowls in a pinch. The presentation won’t be as showy, but the taste is the same.
Preparation Method
Alright, let’s get to the fun part. This recipe is all about layering and chilling, so a little patience goes a long way. Here’s how to make your own Cozy Spooky Graveyard Dirt Pudding Cups.
- Make the Cookie Dirt: Place the entire package of Oreo cookies (cream and all) into your food processor. Pulse until you have fine, dark crumbs that look like potting soil. You want some slightly larger pieces for texture, so don’t over-process it. If you’re using the bag method, place the cookies in a zip-top bag, seal it, and crush them with a rolling pin until you reach the desired consistency. Set the crumbs aside in a bowl.
- Prepare the Cream Cheese Base: In a large mixing bowl, beat the softened cream cheese with an electric mixer on medium speed until it’s smooth and fluffy, about 1-2 minutes. Add the 1/4 cup of powdered sugar and the vanilla extract, and beat until combined. Scrape down the sides of the bowl with your spatula.
- Make the Pudding: In a separate bowl, whisk together the instant chocolate pudding mix and the 2 cups of cold milk. Whisk for about 2 minutes until it starts to thicken. It will be quite loose at first, but don’t worry—it will set up in the fridge.
- Combine Pudding and Cream Cheese: Pour the pudding mixture into the bowl with the cream cheese mixture. Beat on low speed until everything is smooth and combined. There shouldn’t be any streaks of white cream cheese. This is your “graveyard mud” base.
- Whip the Cream: In a clean, cold bowl, beat the heavy whipping cream and the remaining 2 tablespoons of powdered sugar with the electric mixer. Start on low speed to avoid splashing, then gradually increase to high. Beat until stiff peaks form. This means when you lift the beaters, the cream stands up in a peak that doesn’t flop over. Be careful not to over-whip it, or you’ll end up with butter.
- Fold It All Together: Take about 1/3 of the whipped cream and gently fold it into the pudding mixture using your spatula. This lightens the mixture. Then, gently fold in the remaining whipped cream until no white streaks remain. The goal is to keep as much air in the mixture as possible for a light, mousse-like texture.
- Prepare the Tombstones: While the pudding mixture chills, prepare your tombstones. Take your chocolate wafer cookies or Milano cookies and use the black decorating gel to write “RIP,” “Boo,” or silly epitaphs like “Here lies my diet.” Let them sit on a plate so the gel can set a little.
- Assemble the Cups: Now for the fun part. Grab your cups and start layering. Begin with a generous spoonful of the cookie “dirt” at the bottom of each cup. Then, add a layer of the creamy pudding mixture, filling the cup about halfway. Add another layer of cookie dirt, then more pudding, until you reach the top. You want to leave about 1/2 inch of space at the top for the final “dirt” layer.
- Top with Dirt and Decorations: Finish each cup with a final, thick layer of cookie crumbs. This is the “surface” of your graveyard. Gently press a few gummy worms into the side of the cup so it looks like they’re crawling out of the dirt. Place one of your decorated tombstones in the center. You can add a few candy pumpkins around the base for extra color.
- Chill and Serve: This is the hardest part. Place the assembled cups in the refrigerator for at least 2 hours, but 4 hours is better. This allows the pudding to fully set and the cookie crumbs to soften slightly, creating a perfect, spoonable texture. Serve cold.
Pro Tip: If you’re making these for a party, you can prep all the components a day in advance. Keep the cookie dirt in a sealed bag, the pudding mixture in a bowl with plastic wrap pressed directly on the surface, and the tombstones on a plate. Assemble the cups just a few hours before serving to keep the cookies crunchy.
Cooking Tips & Techniques
Over the years, I’ve made these cups more times than I can count, and I’ve learned a few things the hard way. Here are my best tips for perfect results every time.
The Softened Cream Cheese Trap: I cannot stress this enough—your cream cheese must be at room temperature. If it’s cold, it will form little lumps in your pudding that are impossible to get out. Leave it on the counter for at least 30 minutes before you start. If you forget, you can cheat by cutting it into small cubes and microwaving it for 10 seconds at a time.
Don’t Over-Whip the Cream: I once got distracted while whipping the cream and ended up with a bowl of sweet, chunky butter. It was a disaster. Watch your cream carefully. Once it starts to look like billowy clouds and holds a soft shape, slow down your mixer. You want stiff peaks, but not dry, grainy peaks. It should look smooth and luscious.
The Cookie Crumb Size Matters: You don’t want a fine dust for your dirt. You want some texture. If you pulse the Oreos too much, you’ll get a muddy paste. Aim for a mix of fine crumbs and small pebbles. This gives you that satisfying crunch when you bite into it and makes the “dirt” look more realistic.
Layering for the Win: Don’t just dump all the pudding in at once. The layers are what make this dessert special. They create distinct flavor and texture experiences in every bite. Use a spoon or a piping bag to add the pudding layer neatly. It’s a little more work, but the visual payoff is huge.
Timing Your Chill: These cups need time to set. If you serve them too soon, the pudding will be runny, and the whole thing will slide around in the cup. A 2-hour chill is the bare minimum. Overnight is even better. The flavors meld together, and the cookie crumbs soften into a cake-like texture that is absolutely divine.
Variations & Adaptations
One of the best things about this recipe is how easy it is to change up. Here are a few of my favorite variations, all tested in my own kitchen.
Peanut Butter Monster Cups: This is my personal favorite. Before you add the pudding to the cups, swirl in a generous spoonful of creamy peanut butter. Use chocolate pudding and add a layer of crushed Reese’s Peanut Butter Cups along with the Oreo dirt. Decorate with candy eyes for a truly monstrous look.
Vegan & Dairy-Free Graveyard: This version works beautifully. Use a dairy-free instant pudding mix (most are accidentally vegan) and unsweetened almond or oat milk. Replace the cream cheese with a vegan block-style cream cheese (like Tofutti or Violife). For the whipped cream, use a can of full-fat coconut cream that has been chilled overnight. Whip it with a little powdered sugar until fluffy. Use gluten-free Oreos to make it completely allergy-friendly.
Pumpkin Spice Dirt Cups: For a fall twist, swap the chocolate pudding for vanilla or butterscotch. Add 1/2 cup of canned pumpkin puree and 1 teaspoon of pumpkin pie spice to the cream cheese mixture. Use crushed ginger snaps or graham crackers for the “dirt” instead of Oreos. Top with a tiny candy pumpkin instead of a tombstone. It tastes like autumn in a cup.
Brownie Bottom Graveyard: For the ultimate indulgence, skip the first layer of cookie dirt. Instead, bake a batch of your favorite brownies in a 9×13 pan. Let them cool, then cut them into small cubes. Place a layer of brownie cubes at the bottom of each cup before adding the pudding and dirt. It adds a fudgy, chewy texture that is absolutely incredible.
Serving & Storage Suggestions
These cups are best served cold, right out of the refrigerator. The contrast between the cold, creamy pudding and the slightly softened cookie crumbs is pure magic. I like to serve them on a tray with a few extra gummy worms scattered around for effect.
What to Serve with Them: These cups are pretty rich on their own, so I usually keep the accompaniments simple. A tall glass of cold milk is the classic pairing. For an adult Halloween party, they go surprisingly well with a dark stout beer or a spiked apple cider. You could also serve them alongside a plate of fresh fruit to cut through the sweetness.
Storage Instructions: These cups keep beautifully in the refrigerator for up to 3 days. The key is to keep them covered. If your cups don’t have lids, you can cover the top of each one tightly with plastic wrap. The cookies will continue to soften over time, which some people (like me) actually prefer. By day three, the whole thing has a texture almost like a mousse cake.
Can You Freeze Them? I don’t recommend freezing these cups. The pudding and cream cheese mixture can become watery and grainy when thawed, and the texture will be off. If you need to make them far in advance, prepare the components separately and freeze the cookie dirt and the pudding mixture (without the whipped cream folded in). Thaw the pudding in the fridge, whip fresh cream, and assemble.
Reheating? No need to reheat these! They are designed to be enjoyed cold. If you let them sit out at room temperature for too long, they will get too soft and lose their structure. Keep them chilled until you’re ready to serve.
Nutritional Information & Benefits
Let’s be honest—this is a treat, not a health food. But I believe in knowing what you’re eating and finding a little bit of balance. Here’s a general estimate for one serving (based on 8 servings per recipe).
| Nutrient | Amount Per Serving |
|---|---|
| Calories | ~450 kcal |
| Fat | 28g |
| Carbohydrates | 48g |
| Protein | 7g |
| Sugar | 35g |
| Calcium | 10% DV |
Health Benefits (Yes, a Few!): The cream cheese and milk provide a good amount of calcium and protein, which is great for bone health. The dark cocoa in the Oreos contains antioxidants called flavonoids. The heavy cream, while high in fat, is rich in fat-soluble vitamins like A and D. Plus, let’s not forget the mental health benefits of taking 20 minutes to create something fun and delicious. That counts for something!
Dietary Considerations: This recipe contains gluten, dairy, and soy (from the Oreos). For a gluten-free and dairy-free version, see the variations section above. It is not suitable for a low-carb or keto diet due to the high sugar and carbohydrate content from the cookies and pudding.
Conclusion
These Cozy Spooky Graveyard Dirt Pudding Cups are more than just a Halloween dessert. They’re a little bit of edible nostalgia, a fun project, and a genuinely delicious treat all rolled into one. They’re proof that you don’t need a ton of fancy skills or expensive ingredients to create something that looks and tastes absolutely magical. Whether you’re making them for a party, a family movie night, or just because you want a little bit of spooky fun in your life, I promise they’ll deliver.
My favorite thing about this recipe is how it brings people together. I’ve seen my grumpy brother crack a smile over a cup of dirt pudding. I’ve watched kids argue over who gets the gummy worm. It’s a recipe that creates moments, and that’s the best kind of recipe to have.
So go ahead and give it a try! Make them your own. Use a different pudding flavor, add your favorite candy, or draw silly faces on your tombstones. I’d love to hear how they turn out. Drop a comment below and let me know what spooky decorations you came up with. And if you loved this recipe, please share it with a friend who needs a little bit of cozy spooky fun in their life. Happy Halloween, friends!
Frequently Asked Questions
Can I make these dirt pudding cups ahead of time?
Absolutely! In fact, they taste better when made a day in advance. Assemble the cups up to 24 hours before you plan to serve them and keep them covered in the refrigerator. The flavors will meld together beautifully.
Why is my pudding runny?
This usually happens for one of two reasons. First, make sure you are using instant pudding mix, not cook-and-serve. Second, be sure to chill the cups for at least 2-4 hours. The pudding needs time to fully set. If you used the correct pudding and it’s still runny after chilling, you may have added too much milk.
Can I use Cool Whip instead of homemade whipped cream?
Yes, you can. If you’re short on time or don’t have heavy cream on hand, an 8-ounce tub of Cool Whip works perfectly. Just fold it into the pudding mixture the same way you would the homemade whipped cream. The texture will be slightly denser, but it’s still delicious.
How do I keep the tombstones from falling over?
This is a common issue! The trick is to press the bottom of the cookie into the final layer of cookie “dirt” firmly. You can also use a tiny dab of black decorating gel on the bottom of the cookie to act as glue. If you’re still worried, place the tombstones just before serving so they don’t have time to soften and lean.
Can I make these in a large dish instead of individual cups?
Definitely! This is a great option for a party. Use a 9×9 square dish or a 9×13 baking dish. Layer the ingredients as directed, creating one big graveyard scene. You can place all your tombstones and gummy worms on top of the final dirt layer. Just be sure to chill it well before scooping and serving.
Pin This Recipe!
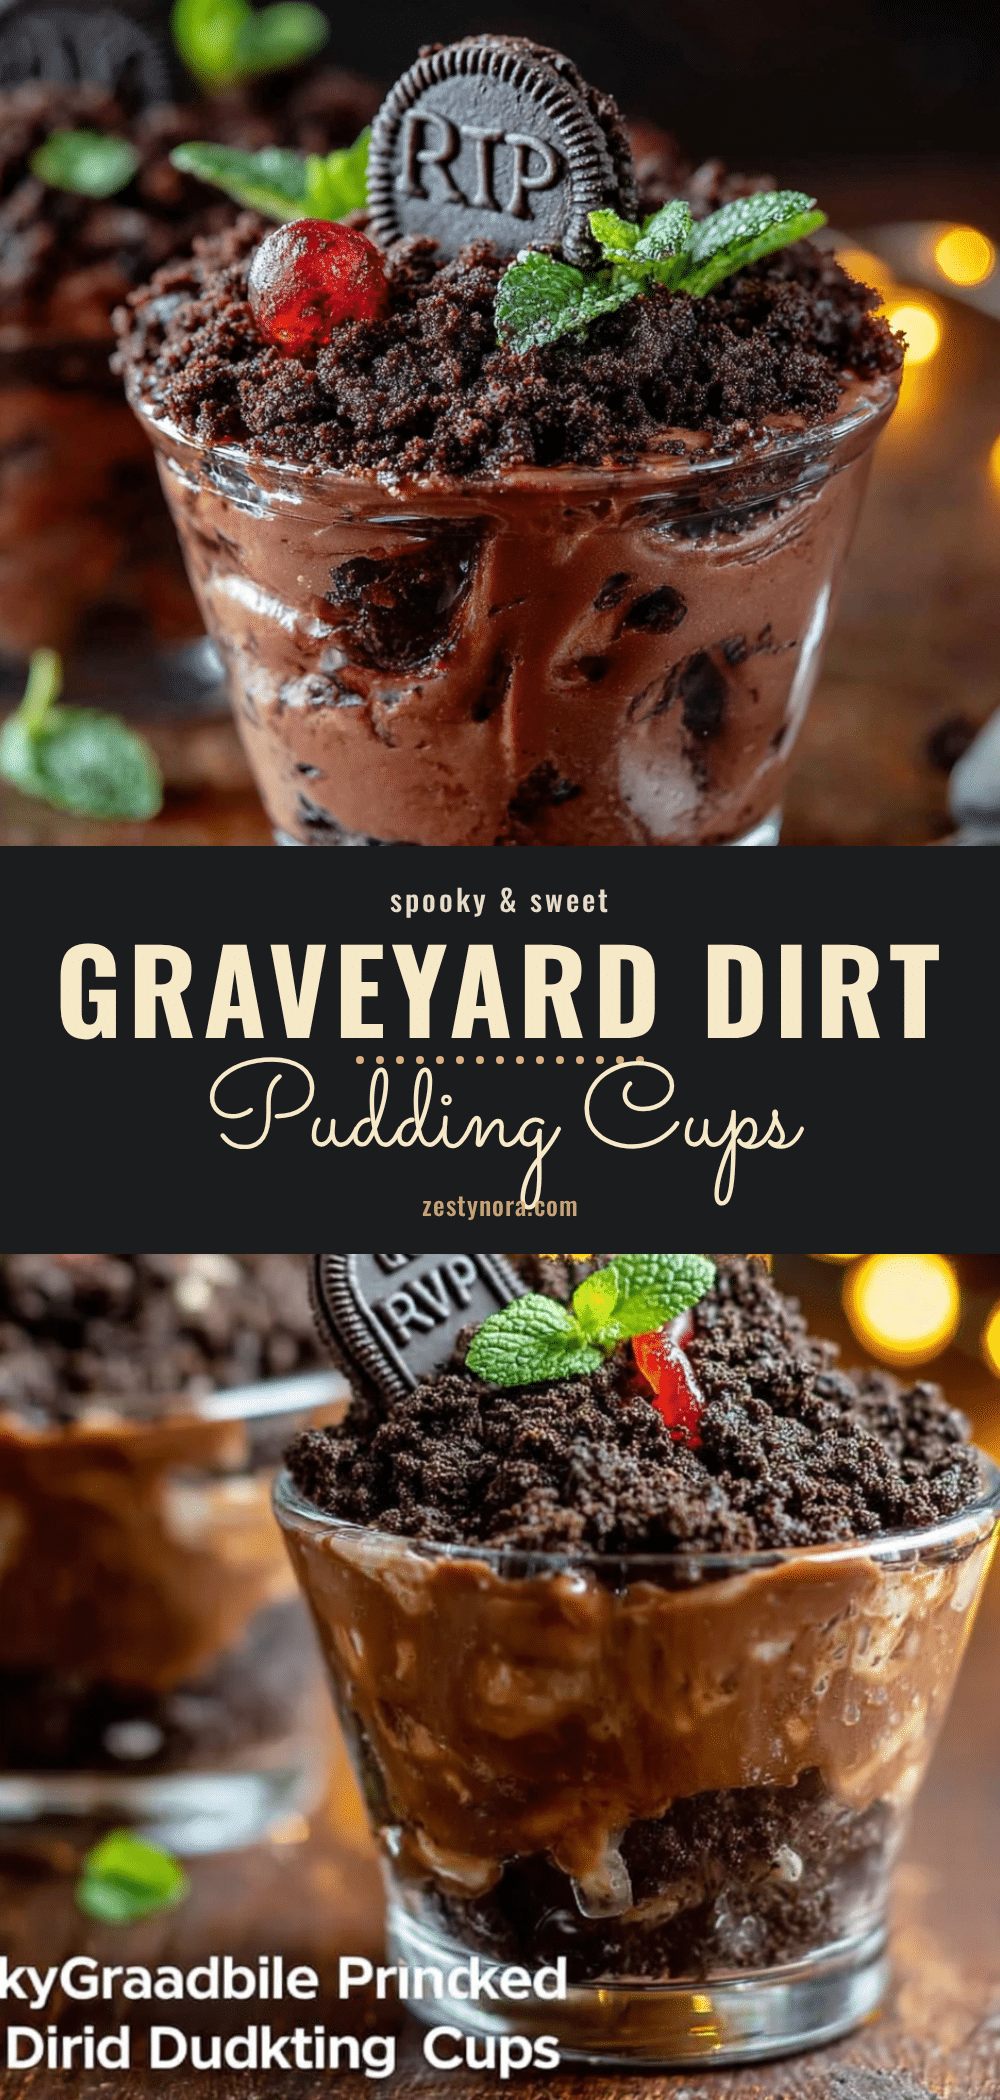
Easy Spooky Graveyard Dirt Pudding Cups Recipe
These creamy, crunchy, and spooky dirt pudding cups are the perfect no-bake Halloween treat. With a velvety chocolate pudding base, a layer of Oreo cookie ‘dirt,’ and fun graveyard decorations, they’re a crowd-pleaser that comes together in under 20 minutes.
- Prep Time: 20 minutes
- Cook Time: 0 minutes
- Total Time: 2 hours 20 minutes (includes chilling)
- Yield: 8 servings 1x
- Category: Dessert
- Cuisine: American
Ingredients
- 1 package (3.9 oz) instant chocolate pudding mix
- 2 cups cold whole milk
- 4 oz cream cheese, softened
- 1/4 cup powdered sugar
- 1/2 teaspoon vanilla extract
- 1 standard package (about 14 oz) Oreo cookies
- 1 cup heavy whipping cream
- 2 tablespoons powdered sugar
- Gummy worms (for decoration)
- Chocolate wafer cookies or Milano cookies (for tombstones)
- Black decorating gel or icing (for writing on tombstones)
- Optional: Candy pumpkins, skeleton bones, or sprinkles
Instructions
- Make the Cookie Dirt: Place the entire package of Oreo cookies (cream and all) into a food processor. Pulse until you have fine, dark crumbs that look like potting soil. Set aside.
- Prepare the Cream Cheese Base: In a large mixing bowl, beat the softened cream cheese with an electric mixer on medium speed until smooth and fluffy, about 1-2 minutes. Add 1/4 cup powdered sugar and vanilla extract, and beat until combined.
- Make the Pudding: In a separate bowl, whisk together the instant chocolate pudding mix and 2 cups of cold milk for about 2 minutes until it starts to thicken.
- Combine Pudding and Cream Cheese: Pour the pudding mixture into the bowl with the cream cheese mixture. Beat on low speed until smooth and combined.
- Whip the Cream: In a clean, cold bowl, beat the heavy whipping cream and remaining 2 tablespoons of powdered sugar with an electric mixer until stiff peaks form.
- Fold It All Together: Take about 1/3 of the whipped cream and gently fold it into the pudding mixture. Then, gently fold in the remaining whipped cream until no white streaks remain.
- Prepare the Tombstones: Use black decorating gel to write ‘RIP’ or spooky messages on chocolate wafer cookies or Milano cookies. Let them sit on a plate to set.
- Assemble the Cups: Start with a generous spoonful of cookie ‘dirt’ at the bottom of each cup. Add a layer of the creamy pudding mixture, filling the cup about halfway. Add another layer of cookie dirt, then more pudding, until you reach the top, leaving about 1/2 inch of space.
- Top with Dirt and Decorations: Finish each cup with a final, thick layer of cookie crumbs. Gently press gummy worms into the side of the cup and place a decorated tombstone in the center. Add optional candy pumpkins.
- Chill and Serve: Refrigerate for at least 2 hours, preferably 4 hours, before serving cold.
Notes
For best results, ensure cream cheese is at room temperature to avoid lumps. Do not over-whip the cream. Cookie crumbs should have some texture, not be a fine dust. Chill for at least 2 hours, but overnight is better for flavor melding. Can be stored covered in the refrigerator for up to 3 days.
Nutrition
- Serving Size: 1 cup
- Calories: 450
- Sugar: 35
- Sodium: 380
- Fat: 28
- Saturated Fat: 16
- Carbohydrates: 48
- Fiber: 2
- Protein: 7
Keywords: Halloween dessert, dirt pudding, graveyard pudding cups, no-bake dessert, chocolate pudding, Oreo dessert, spooky treats, easy Halloween recipe


