The checkout clerk at the grocery store watched me load my conveyor belt with three bags of candy corn, two blocks of cream cheese, and a bag of pretzel sticks. She didn’t say anything at first, just kept scanning. Then she paused, looked at the pile, and said, “You’re either throwing the most interesting party of the year, or you’ve got a very specific craving.” I laughed and told her it was for a Halloween charcuterie board I was testing for a blog post. Her face lit up, and she started telling me about the cheese pumpkin she made last year that her kids still talk about. By the time I paid, she’d given me three tips I hadn’t considered, and I felt like I’d made a friend.
That conversation stuck with me because it reminded me that food doesn’t have to be complicated to bring people together. Honestly, I used to think charcuterie boards were for fancy dinner parties or holiday gatherings that required hours of careful arranging. But this easy Halloween charcuterie board? It changed my mind completely. It’s the kind of thing you can throw together on a Tuesday night when the kids are buzzing with sugar energy and you need something that feels special without being stressful. Maybe you’ve been there—standing in the kitchen at 5 PM wondering how to make a weeknight feel like a celebration without spending your whole evening in the kitchen.
The best part about this board is that it leans into the playful side of Halloween without requiring any artistic talent. I mean, I can barely draw a straight line, but I can definitely shape cream cheese into a pumpkin. The candy corn brings that nostalgic sweetness, the cheese pumpkins add a savory-creamy element, and everything in between fills the gaps with crunchy, salty, and tangy bites. It’s a board that says, “Yes, I put effort into this,” while actually taking about 20 minutes to assemble. That’s my kind of Halloween magic.
Why You’ll Love This Easy Halloween Charcuterie Board
Let me tell you why this board has become my go-to for Halloween weeknights. First off, it’s genuinely quick. From opening the fridge to setting it on the table, we’re talking 20 minutes tops. That’s less time than it takes to order takeout, and honestly, it feels way more special.
- Quick & Easy: Comes together in under 20 minutes, perfect for busy weeknights when you want to surprise your family with something fun.
- Simple Ingredients: No fancy grocery trips needed. Candy corn, cream cheese, cheddar, crackers, and a few veggies—you probably have most of this already.
- Perfect for Halloween Weeknights: Great for before trick-or-treating, a family movie night, or a quick dinner that feels like a party.
- Crowd-Pleaser: Kids go crazy for the candy corn and cheese pumpkins, and adults appreciate the savory-salty balance.
- Unbelievably Delicious: The combination of creamy cheese, crunchy crackers, sweet candy corn, and fresh veggies hits every craving at once.
What makes this board different from other Halloween snacks is how it balances indulgence with actual food. You’re not just serving sugar—you’re offering a spread that includes protein from the cheese, fiber from the veggies, and that satisfying crunch from pretzels and nuts. Plus, the cheese pumpkins are such a conversation starter. Every time I make this, someone asks how I did them, and I get to say, “It’s literally just cream cheese and cheddar shaped into balls with a pretzel stem.” The look on their faces is priceless.
This recipe isn’t just good—it’s the kind that makes you close your eyes after the first bite. It’s comfort food reimagined for Halloween: playful, colorful, and totally doable on a Tuesday night. Perfect for impressing your family without stress, or turning a regular dinner into something memorable.
What Ingredients You Will Need
This easy Halloween charcuterie board uses simple, mostly pantry-stable ingredients to deliver maximum visual impact and flavor. I’ve organized them by their role on the board so you can see what works together.
For the Cheese Pumpkins
- 8 ounces cream cheese, softened (I recommend Philadelphia for the smoothest texture)
- 1 cup sharp cheddar cheese, shredded (buy a block and shred it yourself—it melts better and tastes fresher)
- 1/4 teaspoon garlic powder
- 1/4 teaspoon smoked paprika (adds a subtle smokiness and gives the pumpkins a warm color)
- Salt and black pepper to taste
- Pretzel sticks or small pretzel twists (for the pumpkin stems)
- Fresh chives or small parsley leaves (for the pumpkin vines, optional but cute)
For the Board
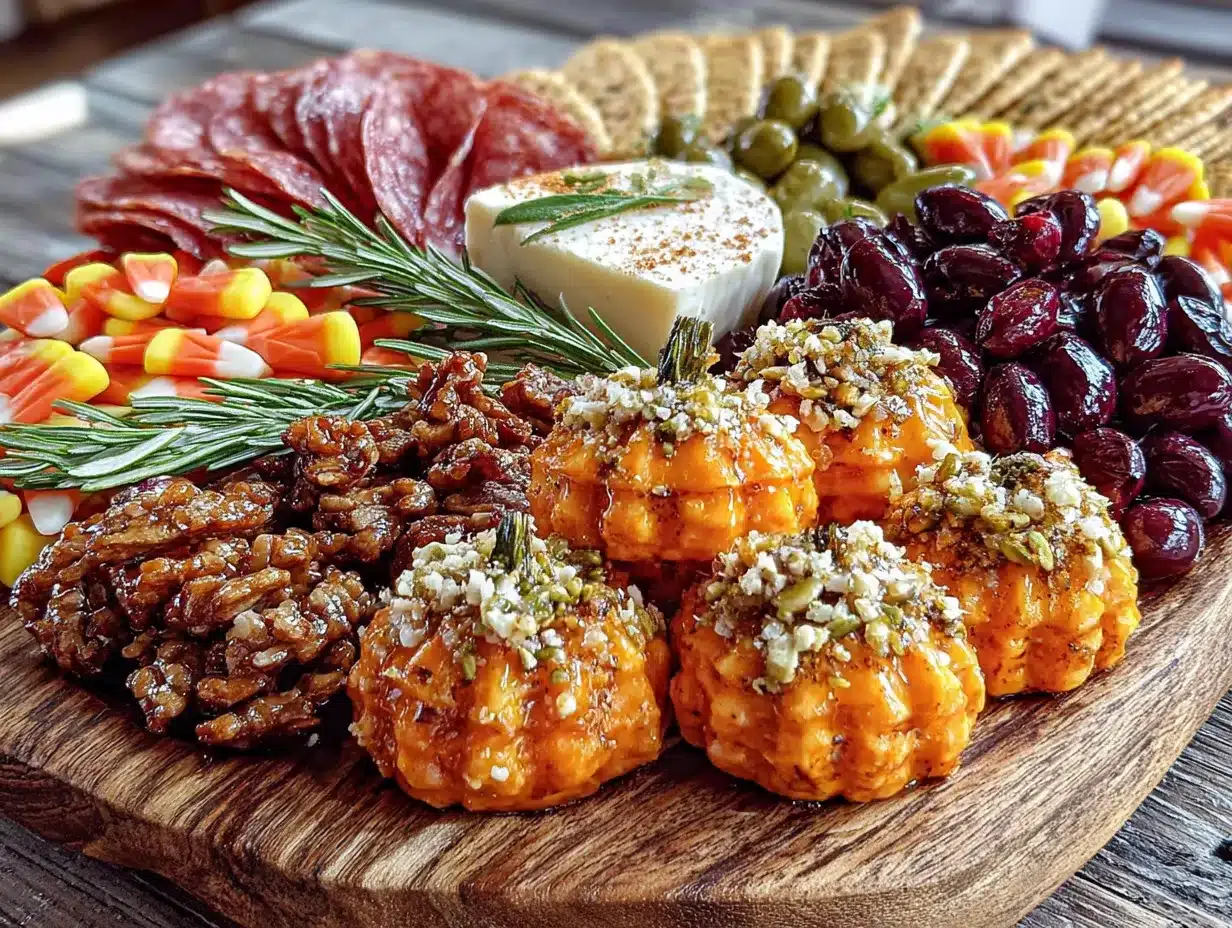
- 1 cup candy corn (the classic orange, yellow, and white mix)
- 1 cup candy pumpkins (those little marshmallow-like ones, optional but extra festive)
- 8 ounces sharp cheddar cheese, sliced or cubed
- 4 ounces salami or pepperoni, sliced
- 1 cup mixed crackers (I like a mix of buttery rounds and whole wheat squares)
- 1 cup pretzel twists or sticks
- 1 cup grapes, red or green
- 1 cup baby carrots
- 1/2 cup hummus or ranch dip (for the veggies)
- 1/4 cup roasted almonds or peanuts (adds a nice salty crunch)
- Fresh rosemary sprigs (for garnish, makes it look fancy)
Ingredient Selection Tips
When you’re buying cream cheese, go for the full-fat version. Low-fat cream cheese tends to be softer and harder to shape into pumpkins—trust me, I learned this the hard way during a test run where my pumpkins turned into blobs. For the cheddar, sharp cheddar gives you more flavor punch, which balances the sweetness of the candy corn beautifully.
If you’re serving this to kids with allergies, swap the almonds for sunflower seeds or omit them entirely. The rest of the board is naturally gluten-free except for the crackers and pretzels, so just choose gluten-free options if needed.
Equipment Needed
- Large wooden cutting board or serving platter (at least 12×16 inches)
- Mixing bowl for the cheese pumpkin mixture
- Rubber spatula
- Plastic wrap or parchment paper (for shaping the cheese pumpkins)
- Small cookie scoop or tablespoon (for portioning the cheese mixture evenly)
- Sharp knife for slicing cheese and salami
- Small bowls or ramekins (for dip, candy corn, and nuts)
- Toothpicks or small skewers (for serving, optional)
If you don’t have a large wooden board, a baking sheet lined with parchment paper works perfectly. I’ve used my trusty old baking sheet more times than I can count, and honestly, it gives the board a rustic, no-fuss look. For the cheese pumpkins, you don’t need any special molds—just your hands and some plastic wrap. I’ve tried using cookie cutters to shape them, but hand-rolling gives a more natural pumpkin look.
One tip: keep a damp paper towel nearby while you’re rolling the cheese pumpkins. It helps keep your hands from getting too sticky, and it makes cleanup way easier.
Preparation Method
Step 1: Make the Cheese Pumpkins (10 minutes)
In a medium mixing bowl, combine the softened cream cheese, shredded cheddar cheese, garlic powder, smoked paprika, salt, and pepper. Mix with a rubber spatula until everything is evenly combined. The mixture should be thick and slightly sticky—if it feels too soft, pop it in the fridge for 5 minutes.
Lay out a sheet of plastic wrap. Using a small cookie scoop or tablespoon, portion the cheese mixture into 6 to 8 equal balls. Place one ball on the plastic wrap, then gather the corners and twist to form a tight, round ball. Repeat with the remaining portions. Refrigerate the wrapped balls for at least 10 minutes—this helps them hold their shape when you add the details.
Once chilled, unwrap each ball and gently roll it between your palms to smooth out any creases. Press your thumb gently into the top center to create a small indent for the stem. Insert a pretzel stick or small pretzel twist into the indent to create the pumpkin stem. For a finishing touch, tuck a small piece of fresh chive or parsley leaf next to the stem to look like a vine. Set the cheese pumpkins aside on a small plate while you assemble the board.
Step 2: Arrange the Board (10 minutes)
Place your large cutting board or serving platter on your counter. Start by positioning the small bowls or ramekins—one for the candy corn, one for the hummus or ranch dip, and one for the nuts. Spread them out evenly so they act as anchors for the rest of the board.
Next, arrange the cheese pumpkins in a small cluster near the center or slightly off to one side. They’re the star of the show, so give them visual prominence. Around them, fan out the sliced cheddar cheese and salami in small piles or overlapping rows.
Fill in the gaps with crackers, pretzels, grapes, and baby carrots. Try to create visual variety—group colors together for impact, like putting green grapes next to orange cheese or red grapes near the salami. Sprinkle the candy corn and candy pumpkins in small clusters around the board, not all in one place. This encourages people to pick from different areas and keeps the board looking full.
Finally, garnish with fresh rosemary sprigs tucked between the cheese and crackers. The rosemary adds a pop of green that makes the orange and yellow elements stand out even more.
Step 3: Serve Immediately or Refrigerate
This board is best served at room temperature, so if you’ve refrigerated the cheese pumpkins, let the board sit out for 15 minutes before serving. The flavors will be more pronounced, and the cream cheese pumpkins will soften slightly, making them easier to spread on crackers.
If you’re making this ahead, prepare the cheese pumpkins and slice the cheese up to a day in advance, but assemble the board no more than 2 hours before serving to keep everything fresh.
Cooking Tips & Techniques
Here are some things I’ve learned from making this board about a dozen times (including a few spectacular failures):
Don’t skip chilling the cheese pumpkins. The first time I made these, I was in a hurry and skipped the fridge step. My pumpkins looked more like cheese blobs with pretzel sticks poking out sadly. Chilling them for even 10 minutes makes a world of difference—they hold their shape and look like actual miniature pumpkins.
Use your hands to mix the cheese. I know, it’s messy. But the warmth of your hands helps the cream cheese and cheddar blend more evenly than a spatula ever could. Just wash your hands thoroughly first, and keep a damp towel nearby.
Layer your board strategically. Start with the bowls and cheese pumpkins, then add the larger items like cheese slices and salami, then fill in with smaller items. This prevents you from running out of space and having to rearrange everything halfway through. I learned this after a particularly frustrating board where I had to move everything to fit the grapes.
Don’t overthink the arrangement. Charcuterie boards are supposed to look a little rustic and abundant. If everything is perfectly spaced, it looks staged and unapproachable. Let some crackers overlap, let the candy corn spill slightly—it looks more inviting that way.
Balance sweet and savory. The candy corn is very sweet, so make sure you have enough salty and savory elements on the board. The salami, pretzels, and roasted nuts are your best friends here. If you notice your board looking too sugary, add another handful of crackers or some extra cheese cubes.
Variations & Adaptations
Dietary Variations
- Gluten-Free: Use gluten-free crackers and pretzels. The rest of the board is naturally gluten-free.
- Vegetarian: Skip the salami and add extra cheese cubes, roasted chickpeas, or marinated artichoke hearts.
- Dairy-Free: Use dairy-free cream cheese and shredded dairy-free cheddar for the pumpkins. The texture will be slightly different, but they still look adorable.
Seasonal Twists
- Fall Harvest Board: Swap candy corn for dried cranberries and add sliced apples and pears. The cheese pumpkins work year-round for fall gatherings.
- Thanksgiving Leftovers Board: Use the cheese pumpkins as a centerpiece and surround them with leftover turkey slices, cranberry sauce, and dinner rolls.
Flavor Variations
- Spicy Pumpkin: Add 1/4 teaspoon cayenne pepper or red pepper flakes to the cheese mixture for a kick.
- Herb Pumpkin: Mix in 1 tablespoon of fresh chopped chives or parsley into the cheese mixture for a fresh, savory note.
- Sweet Pumpkin: Skip the garlic and paprika, and add 1 tablespoon of honey or maple syrup to the cheese mixture for a sweet-savory version that pairs perfectly with the candy corn.
My personal favorite variation is the spicy one. I made it for a Halloween party last year, and people kept coming back for “those little orange cheese things with the kick.” It’s now my go-to for adult gatherings.
Serving & Storage Suggestions
Serve this easy Halloween charcuterie board at room temperature for the best flavor. The cheese pumpkins soften slightly and become spreadable, which is exactly what you want. Set the board out about 15 minutes before your guests arrive, and watch it disappear.
This board pairs beautifully with a warm beverage like apple cider, hot chocolate, or even a glass of crisp white wine if you’re serving adults. For a complete Halloween dinner, serve it alongside a simple soup like butternut squash or tomato bisque.
Storage: If you have leftovers (unlikely, but possible), separate the components. Store the cheese pumpkins in an airtight container in the refrigerator for up to 3 days. They’re great spread on crackers the next day as a snack. Store crackers and pretzels in a sealed bag at room temperature. Candy corn can be stored in a jar or bag at room temperature for weeks. Grapes and carrots should be refrigerated separately.
Reheating: You don’t need to reheat anything. If the cheese pumpkins have been refrigerated, let them sit at room temperature for 15 minutes before serving. The flavors actually develop overnight—the garlic and paprika meld into the cream cheese beautifully, making the leftovers even better than the first day.
Nutritional Information & Benefits
Here’s an approximate nutritional breakdown for a serving of this board (about 1/6 of the board, including a cheese pumpkin, crackers, salami, veggies, and a small handful of candy corn):
- Calories: 380-420
- Protein: 14g
- Fat: 22g
- Carbohydrates: 35g
- Fiber: 3g
- Sugar: 18g (mostly from candy corn and grapes)
While this board is definitely a treat, it does offer some nutritional benefits. The cream cheese and cheddar provide calcium and protein, which help keep you full. The grapes and carrots add fiber and vitamins, and the nuts contribute healthy fats. The candy corn is pure sugar, but in moderation, it’s part of the fun—Halloween is about balance, not perfection.
If you’re watching your sugar intake, you can reduce the candy corn to just a few pieces per serving or swap it for dried unsweetened cranberries. The cheese pumpkins themselves are low in sugar and high in protein, making them a satisfying centerpiece.
This board is naturally vegetarian (if you skip the salami) and can easily be made gluten-free or dairy-free with simple substitutions. It’s a flexible recipe that works for most dietary needs.
Conclusion
This easy Halloween charcuterie board with candy corn and cheese pumpkins has become a staple in my kitchen during October, and I think it deserves a spot in yours too. It’s quick enough for a busy weeknight, fun enough to feel like a celebration, and simple enough that anyone can make it—even if you’ve never assembled a charcuterie board before.
What I love most about this recipe is how it brings a little joy to an ordinary evening. There’s something special about setting a colorful board on the table and watching everyone’s faces light up. The cheese pumpkins always get a laugh, the candy corn satisfies that sweet tooth, and the whole thing comes together in less time than it takes to decide what to order for delivery.
I’d love to hear how your board turns out! Did you add your own twist? Did the kids help shape the cheese pumpkins? Drop a comment below and share your creation. And if you’re looking for more easy weeknight recipes, check out our quick fall appetizer recipes and 30-minute Halloween dinner ideas for more inspiration.
Happy Halloween, and happy snacking!
Frequently Asked Questions
Can I make the cheese pumpkins ahead of time?
Absolutely! You can prepare the cheese pumpkins up to 2 days in advance. Keep them wrapped in plastic wrap in an airtight container in the refrigerator. Let them sit at room temperature for 15 minutes before serving so they soften slightly.
What if I don’t have smoked paprika?
Regular paprika works fine, or you can skip it altogether. The cheese pumpkins will still look adorable and taste great. If you want a smoky flavor without paprika, try adding a tiny pinch of cumin.
Can I use pre-shredded cheese for the pumpkins?
You can, but I recommend shredding your own cheddar from a block. Pre-shredded cheese has anti-caking agents that can make the mixture grainy and less smooth. Freshly shredded cheese blends much better with the cream cheese.
How do I keep the candy corn from getting stale?
Store any leftover candy corn in an airtight container or sealed bag at room temperature. It stays fresh for weeks. Just keep it away from moisture—humidity can make it sticky and hard.
What other veggies can I add to the board?
Almost any crunchy vegetable works! Try cucumber slices, bell pepper strips, cherry tomatoes, or snap peas. Just make sure they’re cut into bite-sized pieces so they’re easy to grab and dip.
PrintEasy Halloween Charcuterie Board with Candy Corn & Cheese
A quick and playful Halloween charcuterie board featuring adorable cream cheese pumpkins, candy corn, and savory snacks. Perfect for a festive weeknight dinner or pre-trick-or-treating snack, this board comes together in just 20 minutes.
- Prep Time: 20 minutes
- Cook Time: 0 minutes
- Total Time: 20 minutes
- Yield: 6 servings 1x
- Category: Appetizer
- Cuisine: American
Ingredients
- 8 ounces cream cheese, softened
- 1 cup sharp cheddar cheese, shredded
- 1/4 teaspoon garlic powder
- 1/4 teaspoon smoked paprika
- Salt and black pepper to taste
- Pretzel sticks or small pretzel twists (for pumpkin stems)
- Fresh chives or small parsley leaves (for pumpkin vines, optional)
- 1 cup candy corn
- 1 cup candy pumpkins (optional)
- 8 ounces sharp cheddar cheese, sliced or cubed
- 4 ounces salami or pepperoni, sliced
- 1 cup mixed crackers
- 1 cup pretzel twists or sticks
- 1 cup grapes, red or green
- 1 cup baby carrots
- 1/2 cup hummus or ranch dip
- 1/4 cup roasted almonds or peanuts
- Fresh rosemary sprigs (for garnish)
Instructions
- In a medium mixing bowl, combine softened cream cheese, shredded cheddar cheese, garlic powder, smoked paprika, salt, and pepper. Mix with a rubber spatula until evenly combined. If too soft, refrigerate for 5 minutes.
- Lay out a sheet of plastic wrap. Using a small cookie scoop or tablespoon, portion the cheese mixture into 6 to 8 equal balls. Place one ball on the plastic wrap, gather the corners, and twist to form a tight, round ball. Repeat with remaining portions. Refrigerate wrapped balls for at least 10 minutes.
- Once chilled, unwrap each ball and gently roll between your palms to smooth out creases. Press your thumb gently into the top center to create a small indent for the stem. Insert a pretzel stick or small pretzel twist into the indent. For a finishing touch, tuck a small piece of fresh chive or parsley leaf next to the stem. Set aside.
- Place your large cutting board or serving platter on your counter. Start by positioning small bowls or ramekins for candy corn, hummus or ranch dip, and nuts. Spread them out evenly.
- Arrange the cheese pumpkins in a small cluster near the center or slightly off to one side. Fan out sliced cheddar cheese and salami in small piles or overlapping rows around them.
- Fill in the gaps with crackers, pretzels, grapes, and baby carrots. Create visual variety by grouping colors together. Sprinkle candy corn and candy pumpkins in small clusters around the board.
- Garnish with fresh rosemary sprigs tucked between the cheese and crackers.
- Serve immediately or refrigerate. If refrigerated, let the board sit at room temperature for 15 minutes before serving.
Notes
Don’t skip chilling the cheese pumpkins—they hold their shape better. Use full-fat cream cheese for best results. For a gluten-free version, use gluten-free crackers and pretzels. For a dairy-free version, use dairy-free cream cheese and shredded dairy-free cheddar. Store leftovers separately: cheese pumpkins in an airtight container in the fridge for up to 3 days, crackers and pretzels at room temperature, and candy corn in a sealed bag.
Nutrition
- Serving Size: 1/6 of the board
- Calories: 380420
- Sugar: 18
- Sodium: 600
- Fat: 22
- Saturated Fat: 12
- Carbohydrates: 35
- Fiber: 3
- Protein: 14
Keywords: Halloween charcuterie board, candy corn, cheese pumpkins, easy appetizer, Halloween snack, quick recipe, party platter