This was supposed to be a batch of my go-to chocolate crinkles. You know the ones—perfectly round, powdered sugar-dusted, the kind that disappear at every holiday cookie swap. But last October, standing in my kitchen on a drizzly Tuesday afternoon, I grabbed the wrong bag from the pantry. Instead of granulated sugar, I reached for the dark brown sugar I had stashed for another project. I didn’t even notice until the mixer was already whirring away, and the dough had that suspiciously sticky, almost fudge-like texture. I was already running late for a pumpkin carving party at my friend Maria’s house, and honestly, I wanted to toss the whole bowl in the trash. But I didn’t. I scooped the dough onto the baking sheet anyway, thinking I would just have to explain why my cookies looked like little chocolate blobs. What came out of the oven was nothing like the plan—and so much better. The centers stayed soft and almost gooey, the tops cracked in these dramatic, irregular webs, and the flavor was deeper, richer, like a brownie had a baby with a cookie. I nearly dropped the spatula when I saw them. That first bite had this unexpected, fudgy chew that made me close my eyes. I shoved a few into a tin and brought them to the party anyway. They were gone before I even got a drink.
Honestly, maybe you’ve been there. You’re trying to impress a crowd, and the recipe you trusted just decides to rebel. A wrong ingredient, a distracted moment, an overheated oven—something goes sideways, and you’re left staring at a baking sheet full of what feels like a mistake. But sometimes, those mistakes are the ones that end up becoming your most requested recipe. These spiderweb chocolate spider cookies are exactly that. They started as a happy little kitchen accident, and now I can’t imagine Halloween without them. They have that dramatic, crackled look that screams “spiderweb” without any fancy piping bags or intricate decorating. Just a simple, forgiving dough that bakes up into something that looks like you spent hours on it. I mean, let’s face it—when you’re hosting a Halloween party or bringing a dish to a potluck, you want something that looks impressive but doesn’t make you sweat. These cookies deliver on both fronts. The texture is the real star here—soft, fudgy centers with those beautiful, web-like cracks on top. And the best part? They taste even better the next day, if they last that long.
Why You’ll Love This Recipe
These spiderweb chocolate spider cookies have become my secret weapon for fall gatherings. I have tested this recipe more times than I care to count, tweaking the brown sugar ratio and the chilling time to get that perfect crackled top every single time. Here is why I keep coming back to them, and why you will too:
- Quick & Easy: The dough comes together in about 15 minutes. No stand mixer required—a bowl and a wooden spoon will do the job. The hardest part is waiting for the dough to chill for an hour.
- Simple Ingredients: You likely have everything in your pantry right now. Cocoa powder, flour, butter, eggs, sugar. No specialty Halloween candies or weird extracts needed.
- Perfect for Halloween Parties: These cookies look like they belong on a dessert table at a spooky gathering. The crackled tops naturally resemble spiderwebs, which means zero decorating stress.
- Crowd-Pleaser: I have brought these to work potlucks, neighborhood gatherings, and family dinners. They disappear fast. Kids love the spiderweb look, and adults love the deep, fudgy chocolate flavor.
- Unbelievably Delicious: The texture is what gets everyone. The outside has a slight crackle, but the inside stays soft and almost brownie-like. It is comfort food in cookie form.
What makes this recipe different from the rest is the brown sugar. Most chocolate crinkle recipes use only granulated sugar, which gives a lighter, cakier texture. The dark brown sugar adds moisture and a hint of molasses that deepens the chocolate flavor and creates those dramatic, web-like cracks. It is a small swap that makes a huge difference. I have tested this with both light and dark brown sugar, and dark brown sugar is the clear winner for both flavor and appearance.
This recipe isn’t just good—it is the kind that makes you close your eyes after the first bite. It is comfort food reimagined for the spooky season, with the same soul-soothing satisfaction as a classic chocolate cookie but with a visual twist that steals the table. Perfect for impressing guests without stress, or turning a simple dessert into something memorable.
What Ingredients You Will Need
This recipe uses simple, wholesome ingredients to deliver bold chocolate flavor and that signature spiderweb crackle. Most of these are pantry staples, which makes these cookies perfect for last-minute Halloween baking.
- Unsalted butter, softened (1/2 cup, 1 stick) – I always use unsalted butter to control the salt level. Make sure it is truly softened to room temperature, not melted. Melting the butter will change the texture of the cookies.
- Dark brown sugar, packed (1 cup, 200g) – This is the secret ingredient. The molasses in dark brown sugar adds moisture and depth. Do not substitute with light brown sugar if you want those dramatic spiderweb cracks. I recommend Domino or Wholesome Sweeteners for consistent results.
- Granulated sugar (1/4 cup, 50g) – Just a little to balance the sweetness and help with the crackled texture.
- Large egg (1, room temperature) – Room temperature eggs incorporate more evenly into the batter. If you forget to take it out ahead of time, place the egg in a bowl of warm water for 5 minutes.
- Vanilla extract (1 teaspoon) – Use pure vanilla extract if you have it. It adds warmth and rounds out the chocolate flavor.
- All-purpose flour (1 cup, 120g) – Spoon and level the flour into your measuring cup. Scooping directly from the bag can pack the flour and make the cookies dry.
- Unsweetened cocoa powder (1/3 cup, 30g) – I prefer Dutch-process cocoa for a smoother, richer flavor, but natural cocoa powder works fine too. Hershey’s Special Dark is a great budget-friendly option.
- Baking powder (1/2 teaspoon) – This helps the cookies rise and creates those beautiful cracks.
- Salt (1/4 teaspoon) – A little salt enhances the chocolate flavor. Do not skip it.
- Powdered sugar (1/2 cup, for rolling) – This is what gives the cookies their spiderweb look. The dough absorbs the powdered sugar as it bakes, creating the white cracks against the dark chocolate background.
Substitution Notes: If you are dairy-free, you can use a high-quality vegan butter stick. I have used Miyoko’s with good results, but avoid margarine spreads as they have too much water content. For a gluten-free version, substitute the all-purpose flour with a 1:1 gluten-free baking flour blend. I like King Arthur Measure for Measure. The texture will be slightly more delicate, but the spiderweb effect still works beautifully.
Equipment Needed
You don’t need any fancy equipment for these cookies, which is part of their charm. Here is what you will need:
- Large mixing bowl – Any bowl works, but a wide, shallow bowl makes it easier to cream the butter and sugar together.
- Electric hand mixer or stand mixer – A hand mixer is perfectly fine. I have made these with a wooden spoon too, but it takes a bit more elbow grease to cream the butter and sugar properly.
- Rubber spatula – For scraping down the sides of the bowl and folding in the dry ingredients.
- Baking sheets – I use two light-colored aluminum baking sheets. Dark baking sheets can cause the bottoms of the cookies to brown too quickly.
- Parchment paper or silicone baking mats – Parchment paper is my go-to. It prevents sticking and makes cleanup a breeze. Silicone mats work too, but the cookies might spread slightly more.
- Small bowl for powdered sugar – For rolling the dough balls. A shallow bowl or plate works best.
- Cooling rack – Essential for letting the cookies cool evenly. Do not skip this, or the bottoms can get soggy.
- Cookie scoop (1.5 tablespoon size) – This ensures uniform cookie sizes and even baking. If you don’t have one, use a tablespoon measure.
Budget-Friendly Tip: If you don’t have a cooling rack, you can let the cookies cool on the baking sheet for 5 minutes, then transfer them to a clean kitchen towel. It is not ideal, but it works in a pinch.
Preparation Method

Follow these steps carefully, and you will have a batch of spiderweb cookies that look like they came from a bakery. The key is not to rush the chilling step—trust me on this.
- Cream the butter and sugars. In a large mixing bowl, beat the softened butter, dark brown sugar, and granulated sugar together until light and fluffy. This takes about 2-3 minutes with an electric mixer on medium speed. Scrape down the sides of the bowl halfway through. The mixture should look pale and slightly aerated. Do not skip this step—proper creaming creates the structure for those beautiful cracks.
- Add the egg and vanilla. Crack the egg into the butter mixture and add the vanilla extract. Beat on low speed until just combined. The batter might look slightly separated at this point, but that is normal. Scrape the bowl again to make sure everything is incorporated.
- Whisk the dry ingredients. In a separate medium bowl, whisk together the all-purpose flour, cocoa powder, baking powder, and salt. Whisking ensures the baking powder is evenly distributed, which prevents any bitter pockets in the cookies.
- Combine wet and dry ingredients. Gradually add the dry ingredients to the wet mixture, mixing on low speed or folding with a spatula. Mix until just combined. Do not overmix, or the cookies will become tough. The dough will be very soft and slightly sticky—that is exactly what you want.
- Chill the dough. Cover the bowl with plastic wrap and refrigerate for at least 1 hour. This is non-negotiable. Chilling solidifies the butter, which prevents the cookies from spreading too much in the oven and helps create those dramatic cracks. I have chilled it for up to 24 hours, and the results are even better.
- Preheat the oven. About 15 minutes before you are ready to bake, preheat your oven to 350°F (175°C). Line two baking sheets with parchment paper.
- Roll the dough balls. Place the powdered sugar in a small bowl. Using a cookie scoop or your hands, roll the chilled dough into 1.5-tablespoon-sized balls (about 1.5 inches in diameter). The dough will be slightly sticky, so lightly dampen your hands if needed. Roll each ball generously in the powdered sugar, making sure it is completely coated. Do not shake off the excess—the thick coating is what creates the spiderweb effect.
- Bake the cookies. Place the sugar-coated dough balls on the prepared baking sheets, spacing them about 2 inches apart. Bake for 10-12 minutes. The cookies will look puffy and slightly cracked on top. The edges should be set, but the centers will still look soft. Do not overbake—they continue to set on the baking sheet after you take them out of the oven.
- Cool the cookies. Let the cookies cool on the baking sheet for 5 minutes. This allows them to firm up without sticking. Then transfer them to a cooling rack to cool completely. The cracks will become more pronounced as they cool.
Pro Tip from My Kitchen: If you want extra dramatic spiderwebs, roll the dough balls in powdered sugar, then let them sit at room temperature for 5 minutes before baking. The sugar will start to absorb into the dough slightly, creating even more pronounced white cracks against the dark chocolate.
Cooking Tips & Techniques
I have made these cookies more times than I can count, and I have learned a few things the hard way. Here are my best tips for perfect spiderweb cookies every time.
Don’t Skip the Chill. I know it is tempting to skip the chilling step when you are in a hurry. But I have done it, and the result is flat, sad cookies with barely any cracks. The cold dough is what creates the contrast between the dark cookie and the white powdered sugar. If you are really pressed for time, you can chill the dough in the freezer for 20 minutes, but the texture won’t be quite as good.
Use a Cookie Scoop. Uniform cookie sizes mean uniform baking. I use a 1.5-tablespoon cookie scoop, and it makes the process so much faster. Plus, all the cookies finish baking at the same time, so you don’t have to worry about some being overdone while others are underdone.
Watch the Oven Temperature. Every oven runs a little differently. I recommend using an oven thermometer to make sure your oven is actually at 350°F. My old oven ran hot, and I burned two batches before I figured it out. If your cookies are browning too quickly on the bottom, try placing a second baking sheet underneath to insulate them.
Don’t Overbake. This is the most common mistake I see. The cookies will look underdone when you take them out of the oven, but they continue to bake on the hot baking sheet. If you wait until they look fully set in the oven, they will be dry and crumbly. I pull mine out when the edges are set and the centers still look slightly soft and puffy.
Let Them Cool Properly. I learned this lesson after rushing to move cookies off the baking sheet and ending up with a crumbly mess. Let them sit on the baking sheet for exactly 5 minutes. That gives them enough time to firm up without sticking. Then transfer them to a wire rack to cool completely.
Variations & Adaptations
These spiderweb chocolate spider cookies are incredibly versatile. Here are a few ways I have adapted them over the years.
Peppermint Chocolate Spider Cookies. Add 1/2 teaspoon of peppermint extract along with the vanilla. Crush a few candy canes and sprinkle them on top of the cookies right after they come out of the oven. The red and white crunch against the dark chocolate is perfect for Christmas cookie exchanges.
Spiced Chocolate Spider Cookies. Add 1 teaspoon of cinnamon and 1/4 teaspoon of cayenne pepper to the dry ingredients. The warmth of the cinnamon and the subtle heat from the cayenne pair beautifully with the dark chocolate. These are always a hit at fall gatherings.
Gluten-Free Version. Substitute the all-purpose flour with a 1:1 gluten-free baking flour blend. I have tested this with King Arthur Measure for Measure, and the cookies come out slightly more delicate but still have that beautiful spiderweb crackle. Make sure to chill the dough for at least 2 hours, as gluten-free dough tends to be softer.
White Chocolate Drizzle. For an even more dramatic spiderweb effect, melt 1/4 cup of white chocolate chips and drizzle it over the cooled cookies in a zigzag pattern. It adds a touch of sweetness and makes the cookies look even more impressive on a dessert table.
Dark Chocolate Chunk Addition. Fold in 1/2 cup of dark chocolate chunks after combining the wet and dry ingredients. The extra pockets of melted chocolate take these cookies to the next level. I do this when I want a more decadent treat for a special occasion.
Serving & Storage Suggestions
These cookies are best served at room temperature, which makes them perfect for parties and potlucks. The texture is soft and fudgy, so they don’t need any accompaniments, but a glass of cold milk is always a good idea.
For Halloween Parties: Arrange the cookies on a large platter lined with black or orange tissue paper. You can also place them on a cake stand for a more dramatic presentation. If you want to get really creative, use a toothpick to draw a few extra spiderweb lines with melted white chocolate on top of the cookies.
What to Serve Alongside: These cookies pair beautifully with a warm mug of apple cider or a pumpkin spice latte. For a dessert table, I like to serve them alongside pumpkin bars with cream cheese frosting and caramel apple dip. The combination of flavors is perfect for fall.
Storage Instructions: Store the cookies in an airtight container at room temperature for up to 5 days. Place a slice of bread in the container to keep them soft—the cookies will absorb the moisture from the bread. Do not refrigerate them, as the cold air will dry them out.
Freezing Instructions: You can freeze the baked cookies for up to 3 months. Place them in a single layer in a freezer-safe bag or container, with parchment paper between the layers. Thaw at room temperature for about 30 minutes before serving. You can also freeze the unbaked dough balls. Roll them in powdered sugar, place them on a baking sheet, and freeze until solid. Then transfer them to a freezer bag. Bake directly from frozen, adding 2-3 minutes to the baking time.
Flavor Development: Honestly, these cookies taste even better the next day. The flavors meld together, and the texture becomes even more fudgy. I often make the dough a day ahead and bake them fresh the morning of a party.
Nutritional Information & Benefits
While these are definitely a treat, here is a rough estimate of the nutritional breakdown per cookie (based on 24 cookies).
- Calories: Approximately 120
- Total Fat: 5g
- Saturated Fat: 3g
- Cholesterol: 20mg
- Sodium: 50mg
- Total Carbohydrates: 18g
- Dietary Fiber: 1g
- Sugars: 12g
- Protein: 2g
Health Benefits of Key Ingredients: Cocoa powder is rich in antioxidants called flavonoids, which can help reduce inflammation and support heart health. Dark brown sugar contains trace amounts of minerals like calcium, potassium, and iron from the molasses. While these cookies are not a health food, using real ingredients like butter and eggs provides more nutritional value than processed alternatives.
Dietary Considerations: These cookies are vegetarian. For a dairy-free version, use vegan butter and ensure your powdered sugar is vegan-friendly (some brands use bone char in processing). For a gluten-free version, use a 1:1 gluten-free flour blend. These cookies contain gluten, dairy, and eggs, so they are not suitable for those with allergies to these ingredients.
My Wellness Perspective: I believe in balance. These cookies are a special treat for Halloween and fall celebrations. I don’t worry about the sugar content when I am sharing them with friends and family at a gathering. Food is about connection and joy, and these cookies deliver both.
Conclusion
These spiderweb chocolate spider cookies started as a complete accident, but they have become one of my most requested recipes. There is something so satisfying about pulling a tray of these out of the oven and watching people’s eyes light up when they see those beautiful, crackled tops. They look like you spent hours decorating them, but the secret is that the oven does all the work for you.
I love that this recipe is forgiving enough for beginner bakers but impressive enough for seasoned hosts. Whether you are bringing them to a Halloween potluck, setting up a dessert table for a party, or just making a cozy treat for your family on a crisp October evening, these cookies deliver. They are chocolatey, fudgy, and just a little bit spooky.
I would love to hear how your spiderweb cookies turn out. Did you try any of the variations? Did you add your own twist? Drop a comment below and let me know. And if you are looking for more Halloween dessert ideas, check out my no-bake pumpkin cheesecake for another crowd-pleasing treat. Happy baking, and may your cookies always crack beautifully!
Frequently Asked Questions
Can I use natural cocoa powder instead of Dutch-process?
Yes, you can use natural cocoa powder. The cookies will have a slightly more intense, acidic chocolate flavor, and the color might be a bit lighter. The spiderweb effect still works beautifully. I have tested it both ways, and both versions are delicious.
Why did my cookies not crack?
This usually happens for one of three reasons: the dough was not chilled long enough, the oven temperature was too low, or the dough balls were not rolled generously enough in powdered sugar. Make sure to chill the dough for at least 1 hour, bake at 350°F, and coat the dough balls thoroughly in powdered sugar. Do not shake off the excess.
Can I make the dough ahead of time?
Absolutely. You can refrigerate the dough for up to 3 days before baking. Just make sure it is tightly covered with plastic wrap so it does not dry out. You can also freeze the dough balls for up to 3 months. Bake directly from frozen, adding 2-3 minutes to the baking time.
How do I store these cookies to keep them soft?
Store them in an airtight container at room temperature with a slice of bread. The cookies will absorb the moisture from the bread, keeping them soft and fudgy. Do not refrigerate them, as the cold air will dry them out. They will stay fresh for up to 5 days.
Can I use light brown sugar instead of dark brown sugar?
You can, but the cookies will not have the same depth of flavor or the same dramatic spiderweb cracks. Dark brown sugar has more molasses, which adds moisture and creates a softer, fudgier texture. If you only have light brown sugar, the cookies will still be good, but they will be slightly lighter in color and less crackled.
Pin This Recipe!

Spiderweb Chocolate Spider Cookies: Best Easy Halloween Treat
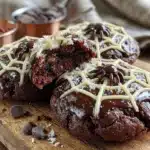
These spiderweb chocolate spider cookies started as a happy kitchen accident, but they’ve become a Halloween favorite. With soft, fudgy centers and dramatic crackled tops that naturally resemble spiderwebs, they look impressive without any fancy decorating.
- Prep Time: 15 minutes
- Cook Time: 10-12 minutes
- Total Time: 1 hour 25 minutes (including chilling)
- Yield: 24 cookies 1x
- Category: Dessert
- Cuisine: American
Ingredients
- 1/2 cup (1 stick) unsalted butter, softened
- 1 cup (200g) dark brown sugar, packed
- 1/4 cup (50g) granulated sugar
- 1 large egg, room temperature
- 1 teaspoon vanilla extract
- 1 cup (120g) all-purpose flour
- 1/3 cup (30g) unsweetened cocoa powder (Dutch-process preferred)
- 1/2 teaspoon baking powder
- 1/4 teaspoon salt
- 1/2 cup powdered sugar, for rolling
Instructions
- Cream the butter and sugars: In a large mixing bowl, beat the softened butter, dark brown sugar, and granulated sugar together until light and fluffy, about 2-3 minutes with an electric mixer on medium speed. Scrape down the sides of the bowl halfway through.
- Add the egg and vanilla: Crack the egg into the butter mixture and add the vanilla extract. Beat on low speed until just combined. Scrape the bowl again.
- Whisk the dry ingredients: In a separate medium bowl, whisk together the all-purpose flour, cocoa powder, baking powder, and salt.
- Combine wet and dry ingredients: Gradually add the dry ingredients to the wet mixture, mixing on low speed or folding with a spatula until just combined. Do not overmix. The dough will be very soft and slightly sticky.
- Chill the dough: Cover the bowl with plastic wrap and refrigerate for at least 1 hour (up to 24 hours).
- Preheat the oven: About 15 minutes before baking, preheat oven to 350°F (175°C). Line two baking sheets with parchment paper.
- Roll the dough balls: Place powdered sugar in a small bowl. Using a cookie scoop or your hands, roll the chilled dough into 1.5-tablespoon-sized balls (about 1.5 inches in diameter). Roll each ball generously in the powdered sugar, making sure it is completely coated. Do not shake off excess.
- Bake the cookies: Place the sugar-coated dough balls on the prepared baking sheets, spacing them about 2 inches apart. Bake for 10-12 minutes. The cookies will look puffy and slightly cracked on top; edges should be set but centers still soft.
- Cool the cookies: Let the cookies cool on the baking sheet for 5 minutes, then transfer to a cooling rack to cool completely.
Notes
For extra dramatic spiderwebs, roll the dough balls in powdered sugar, then let them sit at room temperature for 5 minutes before baking. Do not skip chilling the dough—it’s essential for the crackled effect. Store cookies in an airtight container at room temperature with a slice of bread to keep them soft for up to 5 days. Cookies taste even better the next day.
Nutrition
- Serving Size: 1 cookie
- Calories: 120
- Sugar: 12
- Sodium: 50
- Fat: 5
- Saturated Fat: 3
- Carbohydrates: 18
- Fiber: 1
- Protein: 2
Keywords: spiderweb cookies, chocolate spider cookies, Halloween cookies, chocolate crinkles, fudgy chocolate cookies, easy Halloween treat


