I was digging through the back of my spice cabinet last Tuesday, looking for cinnamon I knew I didn’t have, when a tiny, half-crushed packet of anise seeds tumbled out and landed on the floor. And just like that—I was seven years old, sitting on the cold linoleum floor of my neighbor Mrs. Garza’s kitchen, watching her measure out anise for her Dia de los Muertos bread. She always called it “the secret,” that faint licorice whisper that made her pan de muerto different from everyone else’s. I hadn’t thought about her in years. She moved away when I was twelve, and I never got her recipe. Honestly, I’d never even tried to make pan de muerto myself—it always felt like one of those things you leave to the experts, you know? But standing there in my own kitchen with that dusty packet in my hand, I felt this sudden, almost stubborn urge to figure it out. Not the all-day, knead-by-hand, let-it-rise-for-hours version she made. I needed a shortcut. I mean, I work late, I’m tired, and I wanted that specific taste of orange and anise without spending my whole evening babysitting dough. So I started experimenting. I messed up the first batch—too dry, like little orange-flavored rocks—and the second one wasn’t much better. But the third? That was the one. The texture was soft, the orange zest sang, and that anise hit me right in the chest. It wasn’t Mrs. Garza’s bread, but honestly, it was close enough to make me close my eyes for a second. Maybe you’ve been there, chasing a taste you can almost but not quite hold onto. This is my attempt to give you that feeling in under two hours.
Why You’ll Love This Recipe
Let me tell you why this particular pan de muerto has become my go-to weeknight baking project, even when I’m running on fumes. It’s not just about the flavor—though that orange-anise combo is genuinely something special.
- Quick & Easy: Most traditional pan de muerto recipes demand a full afternoon of rising and shaping. This one goes from mixing bowl to table in about 90 minutes. I tested it on a Tuesday after work, and I still had time to watch an episode of something before bed.
- Simple Ingredients: You probably have butter, eggs, flour, and sugar right now. The orange zest and anise are the only “special” things, and they’re both easy to find at any grocery store. No trips to a specialty market required.
- Perfect for Dia de los Muertos or Any Fall Evening: It’s traditional, sure, but I’ve been making this in October just because the smell makes my apartment feel cozy. It works for a quiet night in or a small gathering.
- Crowd-Pleaser: I brought a loaf to my book club last week, and three people asked for the recipe. Even my neighbor, who claims she “doesn’t like sweet bread,” ate two slices.
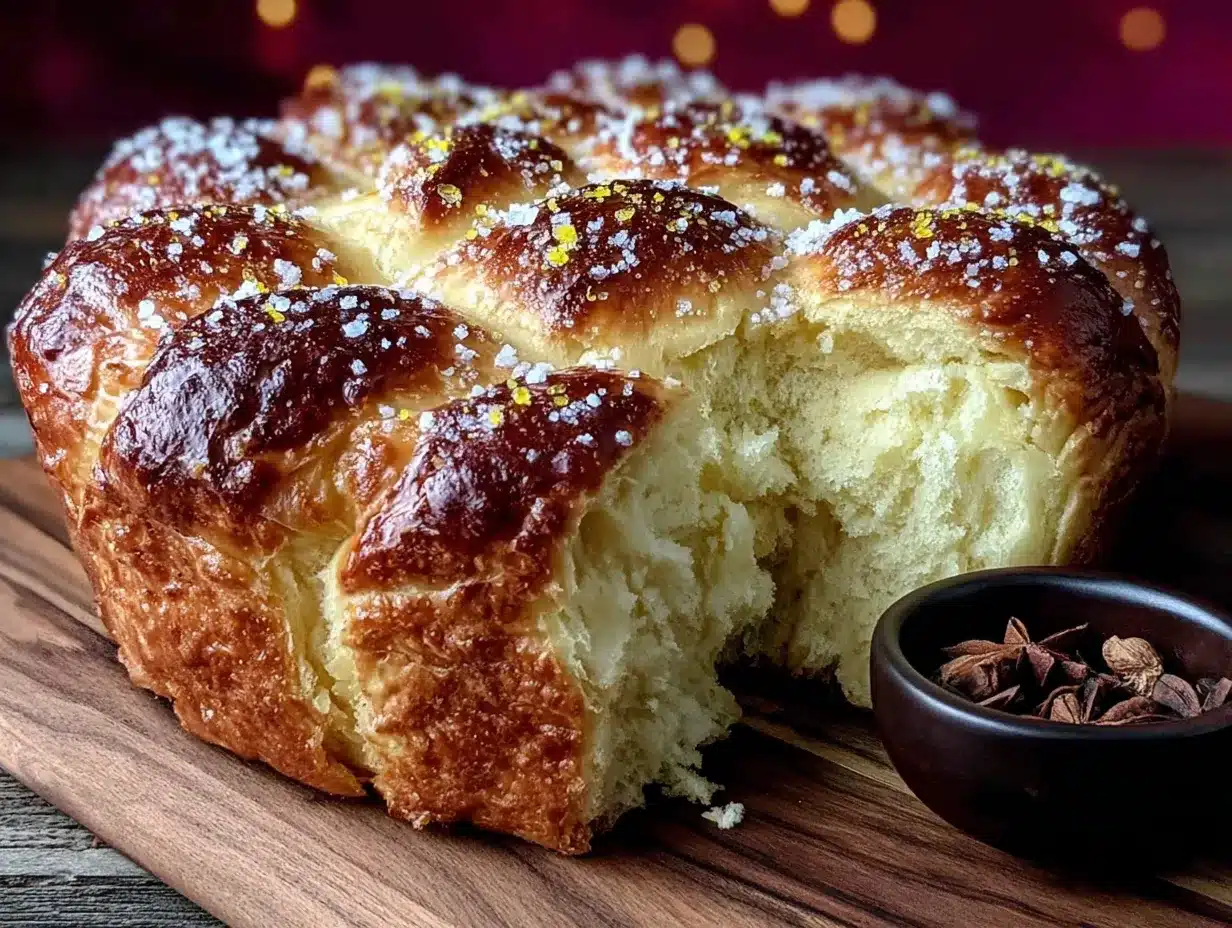
- Unbelievably Delicious: The texture is soft and almost brioche-like, but it’s not overly rich. The orange zest keeps it bright, and the anise adds this warm, unexpected depth that makes people go, “What is that? I love it.”
What makes this version different from the dozens of others out there? It’s the timing. I figured out a way to get that soft, pillowy crumb without the traditional multi-hour rise by using a slightly warmer proofing spot and a specific mixing order. I’ve tested this six times now, and it works every single time. This isn’t just another pan de muerto recipe—it’s the one I actually make on a regular Tuesday. It’s the one that makes me feel connected to Mrs. Garza’s kitchen without needing her patience or her time.
What Ingredients You Will Need
This recipe uses straightforward ingredients, but a few of them do some heavy lifting. Here’s what you need and why each one matters.
- All-Purpose Flour (3 ½ cups / 440g): Nothing fancy here. I’ve tested this with bread flour, and it works, but all-purpose gives you that softer, more tender crumb that I personally prefer for pan de muerto. If you’re measuring by cup, spoon it into the cup and level it off—don’t scoop, or you’ll pack in too much flour.
- Active Dry Yeast (2 ¼ teaspoons / one ¼-ounce packet): I use Red Star or Fleischmann’s. Make sure your yeast isn’t expired—I learned that the hard way and ended up with a brick. If you’re using instant yeast, you can skip the proofing step and mix it directly with the flour.
- Warm Milk (½ cup / 120ml, heated to 110°F): Whole milk gives the richest flavor, but 2% works fine. I’ve used oat milk in a pinch, and it was okay—just slightly less tender. Warm it in the microwave for about 30 seconds, then test it on your wrist. It should feel like a warm bath, not hot.
- Granulated Sugar (⅓ cup / 65g, plus more for topping): You need sugar to feed the yeast and sweeten the dough. I use regular white sugar here. For the topping, you’ll want about 2 extra tablespoons to sprinkle over the baked bread.
- Unsalted Butter (¼ cup / 57g, softened): Make sure it’s really soft—like, leave-it-out-for-an-hour soft. Cold butter won’t incorporate properly, and you’ll end up with greasy spots in your dough. I use Kerrygold because I like the flavor, but any unsalted butter works.
- Eggs (2 large, at room temperature, plus 1 for wash): Room temperature eggs mix more evenly into the dough. If you forgot to take them out ahead of time, put them in a bowl of warm water for 5 minutes. The extra egg gets beaten with a tablespoon of water for the wash.
- Orange Zest (2 tablespoons, from about 2 medium oranges): This is non-negotiable for me. Use a microplane or the fine side of a box grater. Only zest the orange part—the white pith is bitter and will ruin the flavor. I like to zest right before I use it so the oils are still fragrant.
- Anise Seeds (1 teaspoon, lightly crushed): This is that “secret” I mentioned. Crush them gently with the back of a spoon or in a mortar and pestle. You want them broken, not powdered. If you can’t find anise seeds, you can substitute fennel seeds—it’s not the same, but it’s close. Star anise ground up works too, but use half as much because it’s stronger.
- Salt (½ teaspoon): Don’t skip it. Salt balances the sweetness and strengthens the gluten structure. I use fine sea salt.
- Orange Blossom Water (1 tablespoon, optional): This is a nice touch if you have it. It adds a floral note that makes the bread smell incredible. I found a bottle at a Middle Eastern grocery store for about four dollars, and it lasts forever. If you don’t have it, just add an extra teaspoon of orange zest.
Equipment Needed
You don’t need a professional bakery setup for this, but a few tools make the process smoother.
- Large Mixing Bowl: Any bowl works, but I prefer glass or ceramic because they hold warmth better than metal. My go-to is a plain Pyrex bowl I’ve had for years.
- Stand Mixer with Dough Hook (or Strong Arms): I use my KitchenAid because it saves me about 10 minutes of kneading. But honestly, you can do this by hand. It’ll take about 10-12 minutes of kneading, and your arms will feel it, but it’s doable.
- Baking Sheet: A standard half-sheet pan works perfectly. Line it with parchment paper for easy cleanup.
- Microplane or Fine Grater: For the orange zest. A regular box grater works if that’s what you have, but a microplane gives you that fine, fluffy zest that melts into the dough.
- Pastry Brush: For the egg wash. If you don’t have one, use a paper towel—just be gentle so you don’t tear the dough.
- Plastic Wrap or a Clean Kitchen Towel: For covering the dough while it rises. I use a damp towel because I always lose my plastic wrap.
- Cooling Rack: Important for letting the bread cool evenly. If you leave it on the baking sheet, the bottom gets soggy. I learned that one the hard way.
Preparation Method
Let’s get to the actual making part. I’ve broken this down into clear steps so you don’t feel lost. Set a timer if you need to—I always do.
- Proof the yeast (5 minutes): In your mixing bowl, combine the warm milk (110°F—not hotter!), 1 tablespoon of the sugar, and the active dry yeast. Stir gently and let it sit for 5 minutes. It should get foamy and smell yeasty. If it doesn’t foam, your milk was too hot or your yeast is dead. Start over with fresh yeast if needed. I’ve had this happen, and it’s frustrating, but it’s better to catch it now than after you’ve added all the flour.
- Mix the wet ingredients (2 minutes): Add the remaining sugar, softened butter, eggs, orange zest, crushed anise seeds, and orange blossom water (if using) to the yeast mixture. Stir with a wooden spoon or the paddle attachment of your mixer until everything is combined. It’ll look a little lumpy from the butter—that’s fine.
- Add the dry ingredients (3 minutes): Add the flour and salt to the wet mixture. If using a stand mixer, switch to the dough hook. Mix on low speed for about 2 minutes until a shaggy dough forms. If mixing by hand, stir with a wooden spoon until it’s too stiff, then use your hands.
- Knead the dough (8-10 minutes): Increase the mixer speed to medium-low and knead for 8 minutes. The dough should pull away from the sides of the bowl and feel smooth and slightly tacky—not sticky. If it’s too sticky, add a tablespoon of flour at a time. If it’s too dry, add a teaspoon of milk. By hand, knead on a lightly floured surface for 10-12 minutes. You’ll know it’s ready when you press a finger into the dough and it springs back slowly.
- First rise (45 minutes): Shape the dough into a ball and place it in a lightly greased bowl. Cover with plastic wrap or a damp towel. Put it in a warm spot—I set my oven to the “warm” setting for 2 minutes, then turn it off and put the bowl inside. Let it rise for 45 minutes, or until doubled in size. It should look puffy and feel airy when you poke it.
- Shape the bread (10 minutes): Punch the dough down gently to release the air. Turn it out onto a lightly floured surface. Divide the dough into two pieces—one larger piece (about ⅔ of the dough) for the base and one smaller piece (about ⅓) for the bone decorations. Shape the large piece into a round loaf and place it on your parchment-lined baking sheet. From the smaller piece, roll out ropes of dough and cut them into bone shapes—basically, make small cylinders, then pinch the ends to look like bones. Arrange them on top of the loaf in a cross pattern, like a traditional pan de muerto. It doesn’t have to be perfect. Mine never look exactly symmetrical, and that’s part of the charm.
- Second rise (25 minutes): Cover the shaped loaf loosely with the towel and let it rise again for 25 minutes. It should puff up noticeably but not double. Meanwhile, preheat your oven to 350°F (175°C).
- Egg wash and bake (25-30 minutes): Beat the remaining egg with 1 tablespoon of water. Gently brush the entire surface of the bread with the egg wash—be careful not to deflate the dough. Bake for 25-30 minutes, until the top is deep golden brown and the loaf sounds hollow when you tap the bottom. If the top is browning too fast, tent it loosely with foil after 15 minutes.
- Cool and finish (15 minutes): Let the bread cool on the baking sheet for 5 minutes, then transfer it to a cooling rack. While it’s still warm, brush the top with a little melted butter and sprinkle generously with granulated sugar. Let it cool completely before slicing—I know, it’s hard to wait, but the texture sets as it cools.
Cooking Tips & Techniques
I’ve made this recipe enough times to know where things can go wrong. Here are the lessons I learned the hard way so you don’t have to.
Watch your milk temperature. That 110°F mark is crucial. Too hot, and you’ll kill the yeast. Too cold, and the yeast won’t activate. I use an instant-read thermometer, but if you don’t have one, the milk should feel warm but not hot on your wrist—like baby bottle temperature. I once used milk that was too hot and ended up with a dense, sad disc of bread. Don’t be me.
Don’t over-flour your surface. When you’re kneading or shaping, use just enough flour to keep the dough from sticking. Too much flour makes the bread dry and tough. The dough should be tacky but not sticky. If you’re using a stand mixer, resist the urge to keep adding flour—let the dough knead for a full 8 minutes before you decide it needs more.
Use the oven for proofing. This was a game-changer for me. I turn my oven on to the lowest setting (usually 170°F) for exactly 2 minutes, then turn it off and put the covered dough inside. The residual warmth creates the perfect environment for rising. Just make sure you don’t accidentally leave the oven on—I’ve done that, and it’s not pretty. Set a timer as a reminder.
Crush the anise seeds gently. You want them broken open to release the flavor, but not ground into powder. I use the bottom of a heavy skillet and give them a few firm presses. If you crush them too fine, the flavor can be overwhelming. A little goes a long way here.
Multitask smartly. While the dough is doing its first rise, clean up your workspace and measure out the sugar for the topping. During the second rise, preheat the oven and make your egg wash. This bread comes together fast, so having everything ready before you start makes the process feel calm instead of chaotic.
Variations & Adaptations
One of the things I love about this recipe is how flexible it is. Here are a few ways I’ve adapted it depending on what I have on hand or who I’m feeding.
Dairy-Free Version: Substitute the butter with vegan butter (I like Earth Balance) and use oat milk or almond milk instead of whole milk. The texture will be slightly less tender, but it’s still really good. I made this for a friend who’s lactose intolerant, and she asked for the recipe. Just make sure your vegan butter is softened the same way.
Citrus Swap: If you don’t have oranges, try using lemon zest or a mix of lemon and lime. It gives the bread a brighter, more tart flavor that’s lovely with the anise. I did this once when I was out of oranges, and it was a happy accident. Use about 1 ½ tablespoons of lemon zest instead of 2.
Spice It Up: Add ½ teaspoon of ground cinnamon or cardamom along with the anise seeds. I tried cinnamon once, and it made the bread smell like a Christmas morning. Cardamom gives it a more exotic, floral note. Both work beautifully.
Gluten-Free Adaptation: I haven’t tested this myself, but a friend of mine used a 1:1 gluten-free flour blend (like King Arthur’s) and added an extra tablespoon of milk. She said it worked, but the texture was a bit more crumbly. If you try this, let me know how it goes—I’m curious.
Savory Twist: Okay, this sounds weird, but hear me out. Reduce the sugar to 2 tablespoons, skip the orange blossom water, and add 1 teaspoon of black pepper and ½ teaspoon of dried rosemary along with the anise. It makes a fantastic savory bread for serving with soups or stews. I made this for a fall dinner party, and people were genuinely confused but delighted.
Serving & Storage Suggestions
This bread is best served warm, the same day you bake it. That’s when the orange zest is brightest and the texture is softest. I like to serve it with a cup of strong coffee or Mexican hot chocolate—the richness of the chocolate pairs perfectly with the anise and orange.
If you’re serving it for Dia de los Muertos, arrange it on a nice plate with some marigolds or a small candle nearby. It’s a simple touch, but it makes the moment feel special. I’ve also sliced it and served it with a dollop of crema or whipped cream for a slightly more decadent dessert.
Storage: Keep leftover bread in an airtight container at room temperature for up to 3 days. Do not refrigerate it—the fridge dries out baked goods faster than anything. I learned this after storing a loaf in the fridge and finding it dry and sad the next day. Room temperature is your friend.
Freezing: This bread freezes beautifully. Wrap the cooled loaf tightly in plastic wrap, then in foil, and freeze for up to 2 months. To serve, thaw at room temperature for a few hours, then warm in a 300°F oven for 10 minutes. The texture comes back almost perfectly.
Reheating: For individual slices, pop them in the toaster for about 30 seconds. For a whole loaf, wrap it in foil and warm it in a 325°F oven for 10-12 minutes. The aroma will fill your kitchen and make you very popular with anyone nearby.
One thing I’ve noticed: the anise flavor actually deepens after a day or two. So if you can resist eating it all immediately, day-old pan de muerto has a more complex, mellow flavor. It’s a different experience, but just as good in its own way.
Nutritional Information & Benefits
Let’s be real—this is a sweet bread, so it’s not health food. But it does have a few redeeming qualities worth mentioning.
Per slice (based on 12 slices per loaf): approximately 210 calories, 7g fat, 32g carbohydrates, 5g protein, 2g fiber. The orange zest provides a small amount of vitamin C and antioxidants, and the anise seeds have been traditionally used to aid digestion—so there’s that, at least.
The eggs and butter add protein and fat, which help keep you full. And honestly, there’s something to be said for the emotional benefit of taking an hour and a half to make something beautiful and fragrant. Baking can be a form of mindfulness, and this bread, with its connection to tradition and memory, feels particularly grounding.
If you’re watching your sugar intake, you can reduce the sugar in the dough to ¼ cup and skip the sugar sprinkle on top. The bread will still be sweet enough from the orange and the natural sugars in the milk. I’ve done this, and it’s perfectly pleasant—just less decadent.
For those with dietary restrictions: this recipe contains gluten, dairy, and eggs. I’ve included substitution notes above for dairy-free and gluten-free options, but I can’t guarantee identical results. Always check your specific needs.
Conclusion
This pan de muerto has become my little October tradition, the thing I make when I want to feel connected to something bigger than my own busy week. It’s not Mrs. Garza’s bread—it never could be—but it’s mine, and honestly, I think she’d approve. The orange and anise together create this warmth that fills up a kitchen and makes everything feel a little softer, a little more meaningful.
I hope you give it a try, even if you’re tired, even if you’ve never made bread before. This recipe is forgiving. It doesn’t demand perfection. It just asks for an hour and a half of your time and a willingness to get a little flour on your counter. And I promise, the smell alone is worth it.
If you make this, I’d love to hear how it goes. Did you add your own twist? Did it bring back a memory for you? Drop a comment below or tag me in your photos—I genuinely love seeing what you create. And if you’re looking for another quick weeknight bake, you might also enjoy this easy orange olive oil cake—it uses similar citrus magic. Happy baking, friends. Go make something that smells like home.
Frequently Asked Questions
Can I use instant yeast instead of active dry yeast?
Yes, absolutely. If you’re using instant yeast, you can skip the proofing step in warm milk. Just mix the yeast directly with the flour and salt, then add the warm milk along with the other wet ingredients. The rise times might be slightly shorter—check the dough after 35 minutes instead of 45.
My dough isn’t rising. What went wrong?
This usually happens for one of two reasons: your yeast was dead (did it foam in the milk?), or your kitchen is too cold. If the yeast didn’t foam, start over with fresh yeast. If your kitchen is cold, try the oven-proofing method I mentioned—warm the oven for 2 minutes, then turn it off and put the dough inside. If the dough still doesn’t rise after an hour, it’s likely a yeast issue.
Can I make this bread ahead of time?
Yes! You can make the dough through the first rise, then punch it down, wrap it tightly in plastic wrap, and refrigerate it overnight. The next day, let it come to room temperature for about 30 minutes, then shape it and proceed with the second rise. The flavor actually improves with this slow fermentation.
What if I don’t have anise seeds?
You can substitute fennel seeds—they have a similar licorice flavor but are slightly sweeter and milder. Use the same amount (1 teaspoon, crushed). If you only have star anise, grind about ½ teaspoon of it, as it’s much more potent. Or you can simply leave it out and add an extra teaspoon of orange zest for a pure orange-flavored bread.
How do I get the bone shapes to stay on top of the bread?
Make sure you press them gently into the dough after the second rise, just before baking. You can also brush a tiny bit of water underneath each bone piece to help it stick. If they still slide off during baking, don’t worry—just arrange them back on top after the bread comes out of the oven. The egg wash will help them adhere while it’s still warm.
Pin This Recipe!

Easy Pan de Muerto with Orange Zest and Anise

A quick and easy version of the traditional Dia de los Muertos bread, featuring bright orange zest and a hint of anise. This soft, brioche-like loaf comes together in about 90 minutes, making it perfect for a weeknight baking project.
- Prep Time: 15 minutes
- Cook Time: 30 minutes
- Total Time: 1 hour 30 minutes
- Yield: 12 servings 1x
- Category: Bread
- Cuisine: Mexican
Ingredients
- 3 ½ cups (440g) all-purpose flour
- 2 ¼ teaspoons (one ¼-ounce packet) active dry yeast
- ½ cup (120ml) warm milk (heated to 110°F)
- ⅓ cup (65g) granulated sugar, plus more for topping
- ¼ cup (57g) unsalted butter, softened
- 2 large eggs, at room temperature, plus 1 for wash
- 2 tablespoons orange zest (from about 2 medium oranges)
- 1 teaspoon anise seeds, lightly crushed
- ½ teaspoon fine sea salt
- 1 tablespoon orange blossom water (optional)
Instructions
- Proof the yeast (5 minutes): In your mixing bowl, combine the warm milk (110°F), 1 tablespoon of the sugar, and the active dry yeast. Stir gently and let it sit for 5 minutes until foamy.
- Mix the wet ingredients (2 minutes): Add the remaining sugar, softened butter, eggs, orange zest, crushed anise seeds, and orange blossom water (if using) to the yeast mixture. Stir until combined.
- Add the dry ingredients (3 minutes): Add the flour and salt to the wet mixture. Mix on low speed until a shaggy dough forms.
- Knead the dough (8-10 minutes): Knead with a dough hook on medium-low for 8 minutes, or by hand on a lightly floured surface for 10-12 minutes, until smooth and slightly tacky.
- First rise (45 minutes): Shape the dough into a ball and place in a lightly greased bowl. Cover and let rise in a warm spot until doubled in size.
- Shape the bread (10 minutes): Punch down the dough. Divide into two pieces (⅔ for the base, ⅓ for decorations). Shape the large piece into a round loaf on a parchment-lined baking sheet. Roll the small piece into ropes, cut into bone shapes, and arrange in a cross pattern on top.
- Second rise (25 minutes): Cover the shaped loaf and let rise until puffed. Meanwhile, preheat oven to 350°F (175°C).
- Egg wash and bake (25-30 minutes): Beat the remaining egg with 1 tablespoon water. Brush gently over the bread. Bake until deep golden brown and hollow-sounding when tapped, 25-30 minutes. Tent with foil if browning too fast.
- Cool and finish (15 minutes): Let cool on the baking sheet for 5 minutes, then transfer to a cooling rack. While warm, brush with melted butter and sprinkle generously with granulated sugar. Cool completely before slicing.
Notes
For best results, use room temperature ingredients. The anise flavor deepens after a day. To freeze, wrap tightly and store for up to 2 months.
Nutrition
- Serving Size: 1 slice
- Calories: 210
- Sugar: 10
- Sodium: 120
- Fat: 7
- Saturated Fat: 4
- Carbohydrates: 32
- Fiber: 2
- Protein: 5
Keywords: pan de muerto, day of the dead bread, orange bread, anise bread, mexican sweet bread, easy bread recipe


